

DIY: How to Make Frozen and Enriching Halloween Dog Treats
Editor’s note: We are very excited to bring you another edition of #TOCDIY for our special TOC Trick or Treat Series, which is starring Hannah Guttormson this week. Hannah is the owner of K9 Fuel, an ethical dog training and wellness business, and she is a Professional Dog Trainer (KPA-CTP) and Canine Nutrition Specialist (CCN-CASI). Hannah is also a retired athlete, and health and wellness has always been her passion. Her three dogs Fendi, Epic, and Luna love taste testing her recipes and trying new enrichment activities. She told TOC, “We enjoy trying new sports but our main focus will always be letting them be dogs and live their best lives! We love going on adventures!” Hannah is going to teach us how to make “a Halloween stuffable [frozen treat] to enrich your dog’s life with this salmon/chicken blend topped with a berry scary ghost and some coconut cobwebs!” [Disclosure: This post may contain affiliate links, meaning TOC may get a commission if you decide to make a purchase through our links, at no cost to you.]
📎 The Supplies That You’ll Need to Make Frozen Halloween Dog Treats

Tools
Any stuffable of your choice! I used the WestPaw Toppl*
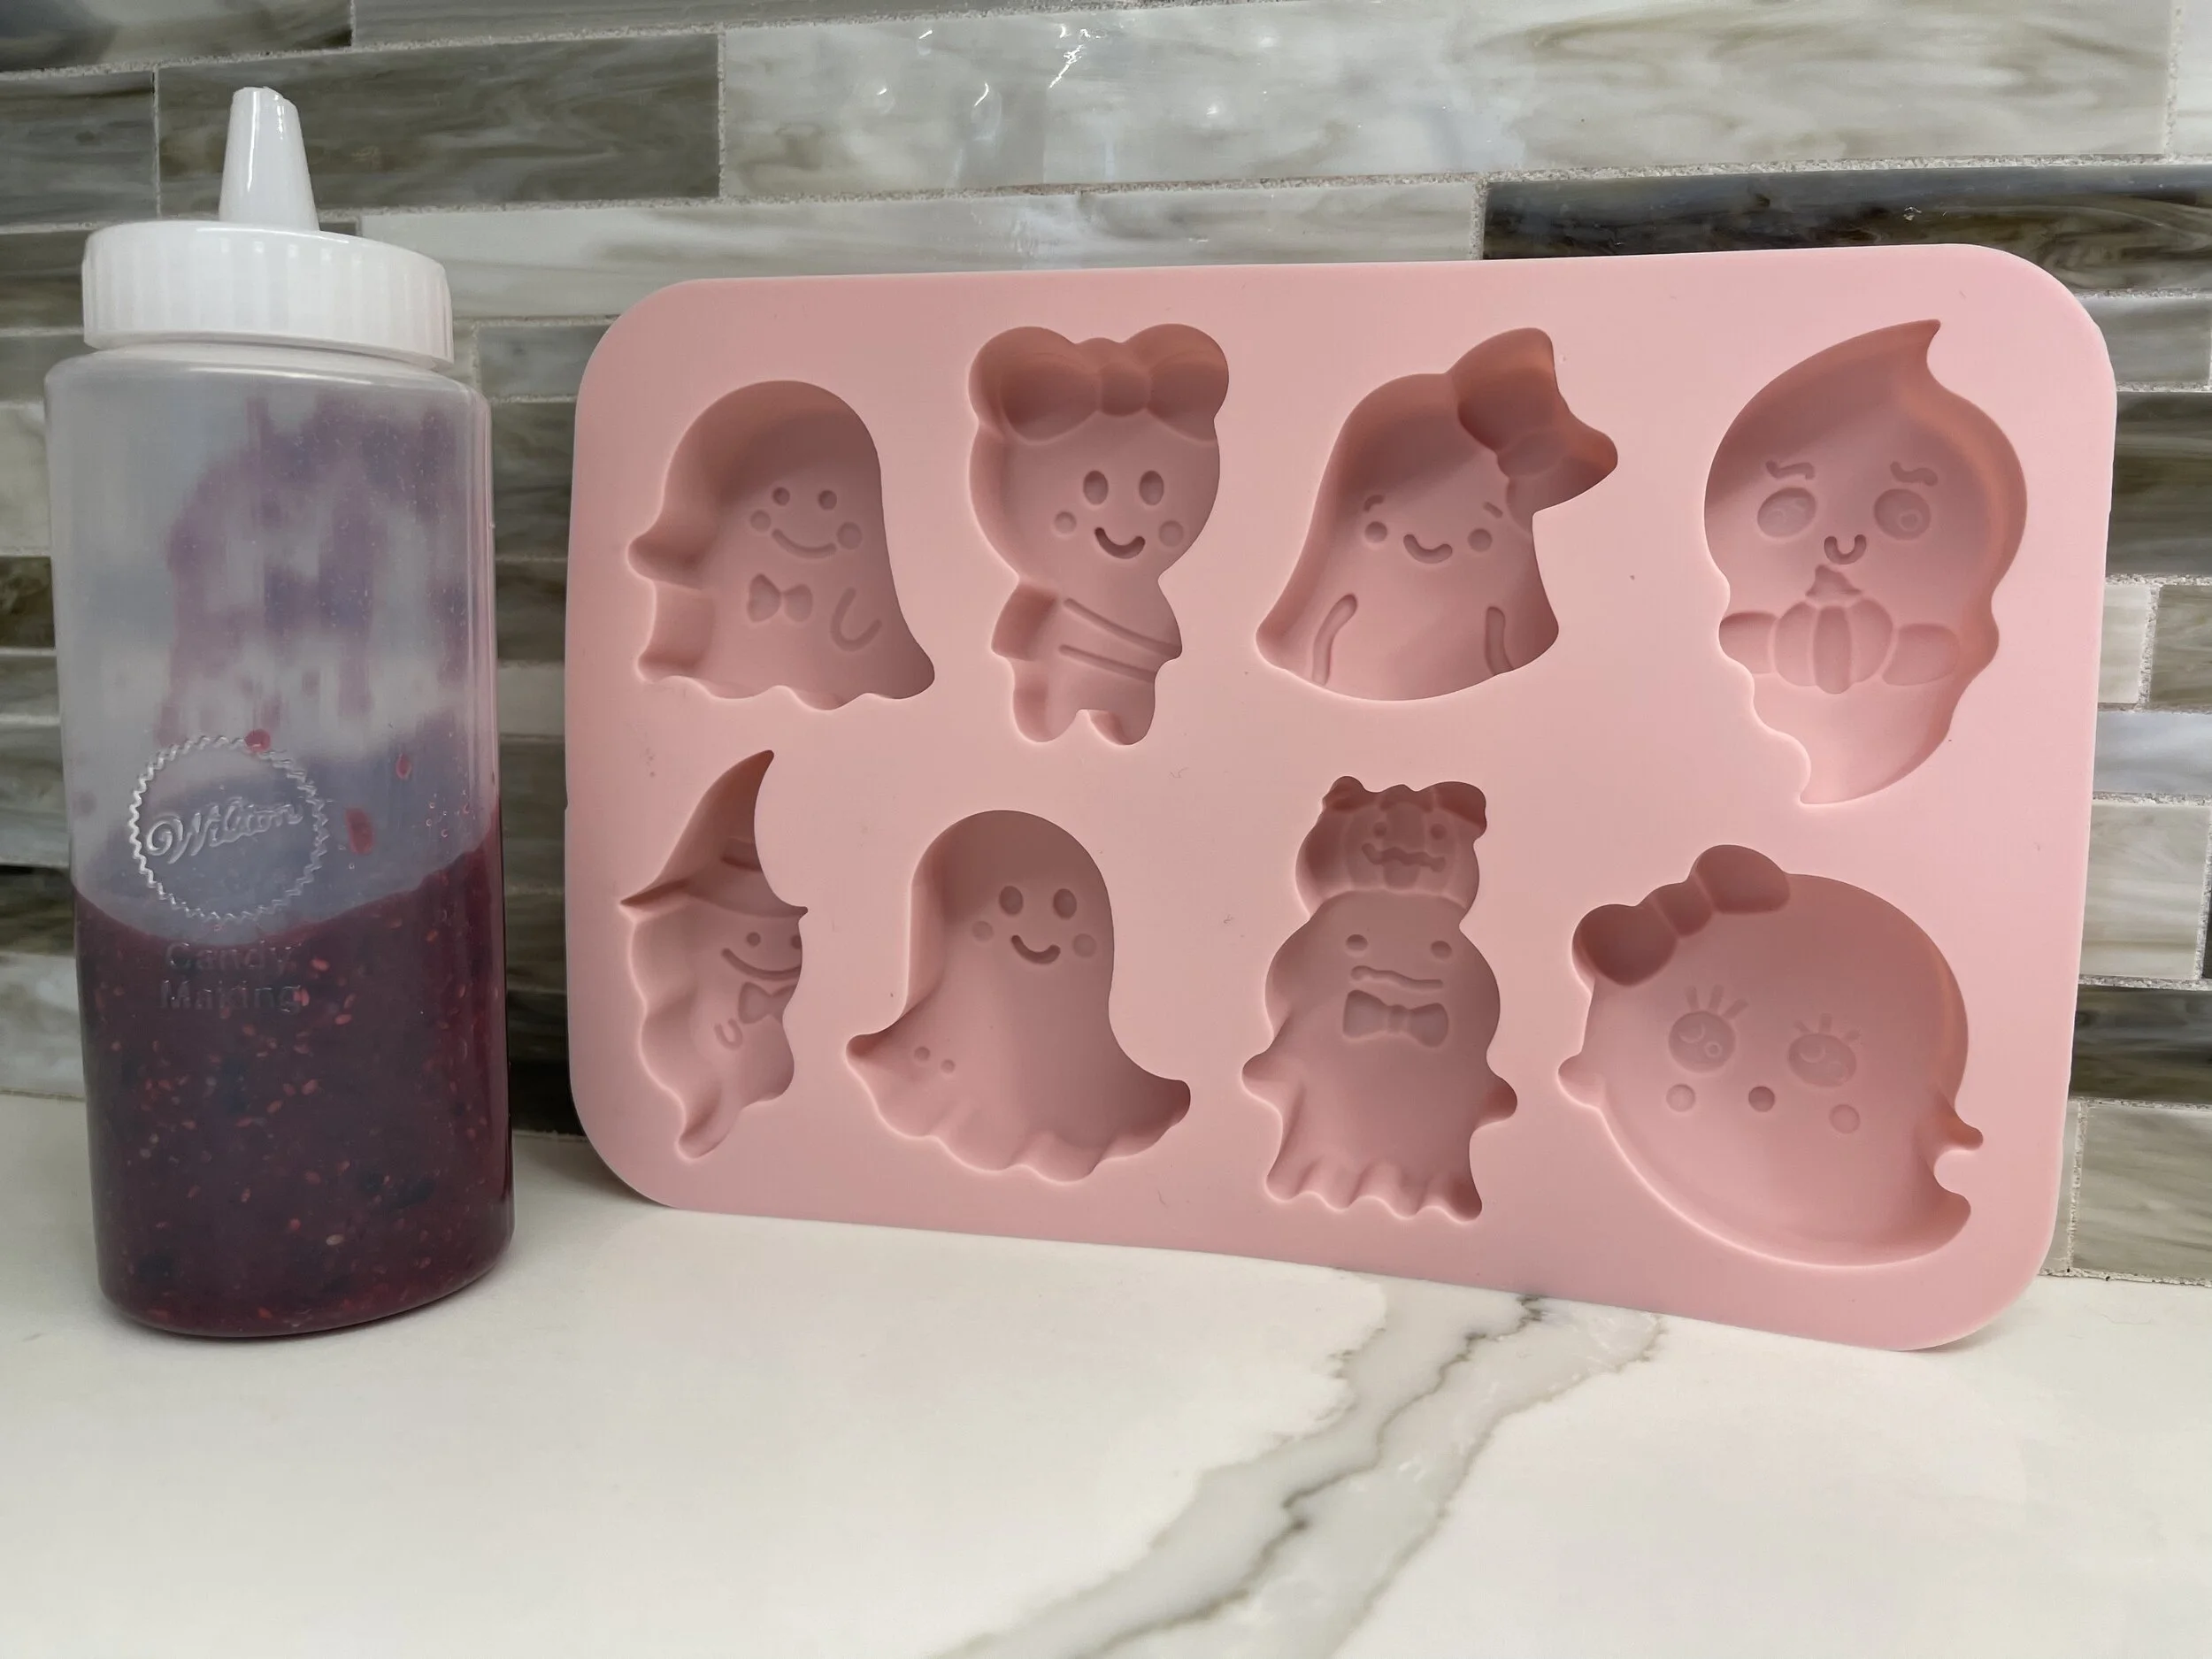
A silicone mold*, but you can also use an ice cube tray*
A food processor or blender

Hannah, seen here with her silver lab Fendi, is a natural health practitioner and she has her diploma in canine nutrition, along with being a Karen Pryor Academy Certified Training Partner.
Ingredients
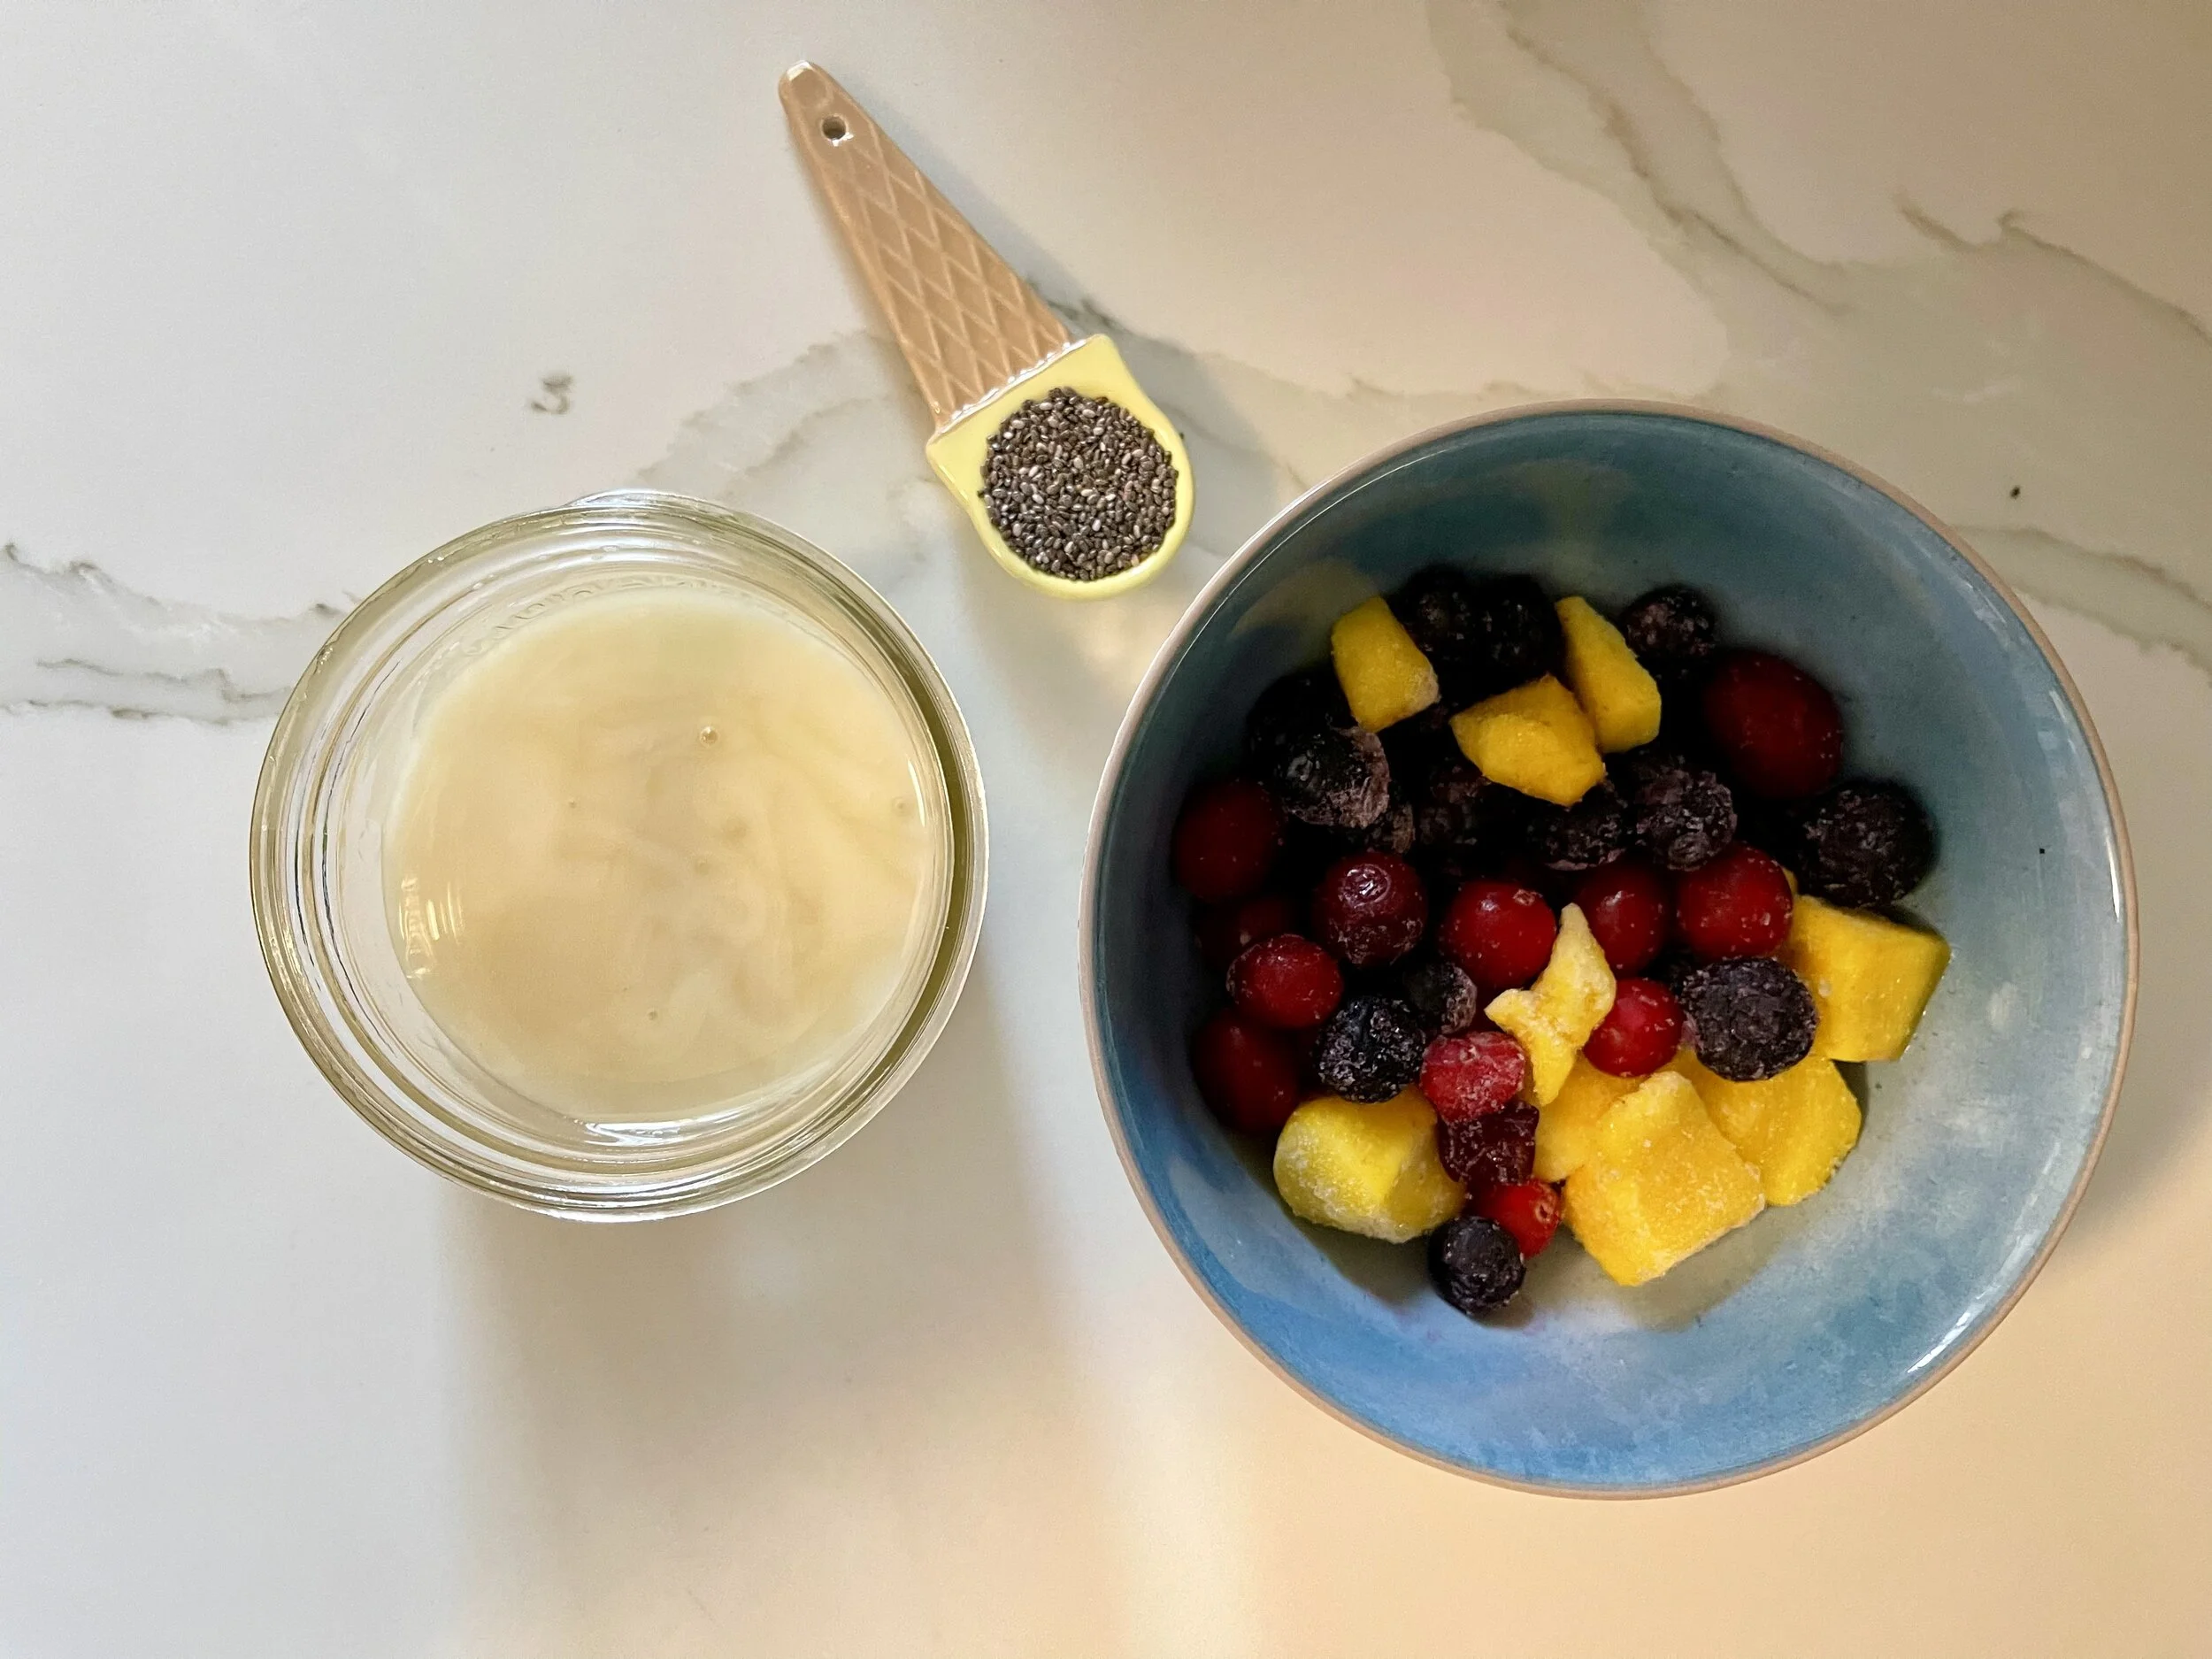
Fruit! Can be frozen or fresh: 1/4 cup of mango, 1/4 cup of cranberries, and 1/4 cup of blueberries
2 tsp of chia seeds
1 tbsp of raw honey
1 chicken breast (boneless and skinless)
1 can of salmon (stored in water, not oil and never feed your dog raw Pacific salmon)
3/4 cup of pumpkin puree
1/2 cup of spinach (fresh or frozen)
Unsweetened shredded coconut
⏰ Time Commitment
This project will take two hours if you are making the frozen toppers (the berry scary ghost garnish) at the same time. If the frozen toppers are pre-made, you can make this in 30 minutes.
⚖️ Skill Level
Easy (as long as you've baked/cooked anything in your life before!).
✅ Step by Step: How to Cook Your Dog Homemade Halloween Treats
This recipe requires that you make the cute garnish or berry scary ghost fruit topper (step one), and then you need to make the main mixture to fill the toppl (step two). Finally you need to combine those two elements (the fruit topper and the main mixture) for your final product that you’ll freeze (step three). Keep scrolling to find out how you do that.
Step One: Make the cute fruit topper or the berry scary ghost garnish part of the frozen treat
If using frozen fruit, allow to thaw completely
In a food processor or blender, combine 1/4 cup of mango, 1/4 cup of cranberries, and 1/4 cup of blueberries
Add water as needed for desired texture!
Add 1 tbsp of raw honey
Add 2 tsp of chia seeds
Use a batter bottle*, piping bag or spoon, and add the mixture to your silicone mold of choice! This is the mold I use.* Place it in the freezer for 1-2 hours or until frozen.
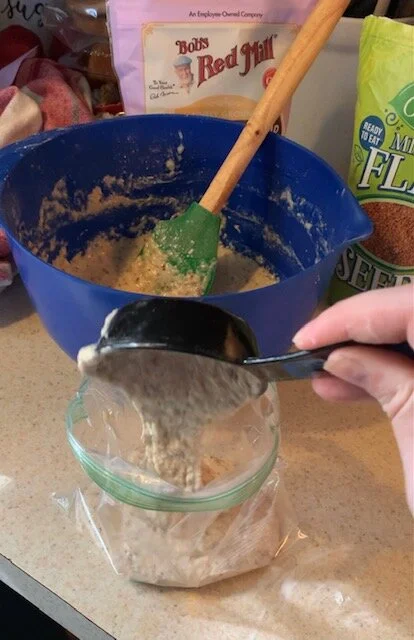
Step Two: Make the main mixture part of the frozen treat
Bring a pot of water to a boil
Add your chicken breast and boil for 15 minutes, or until fully cooked through
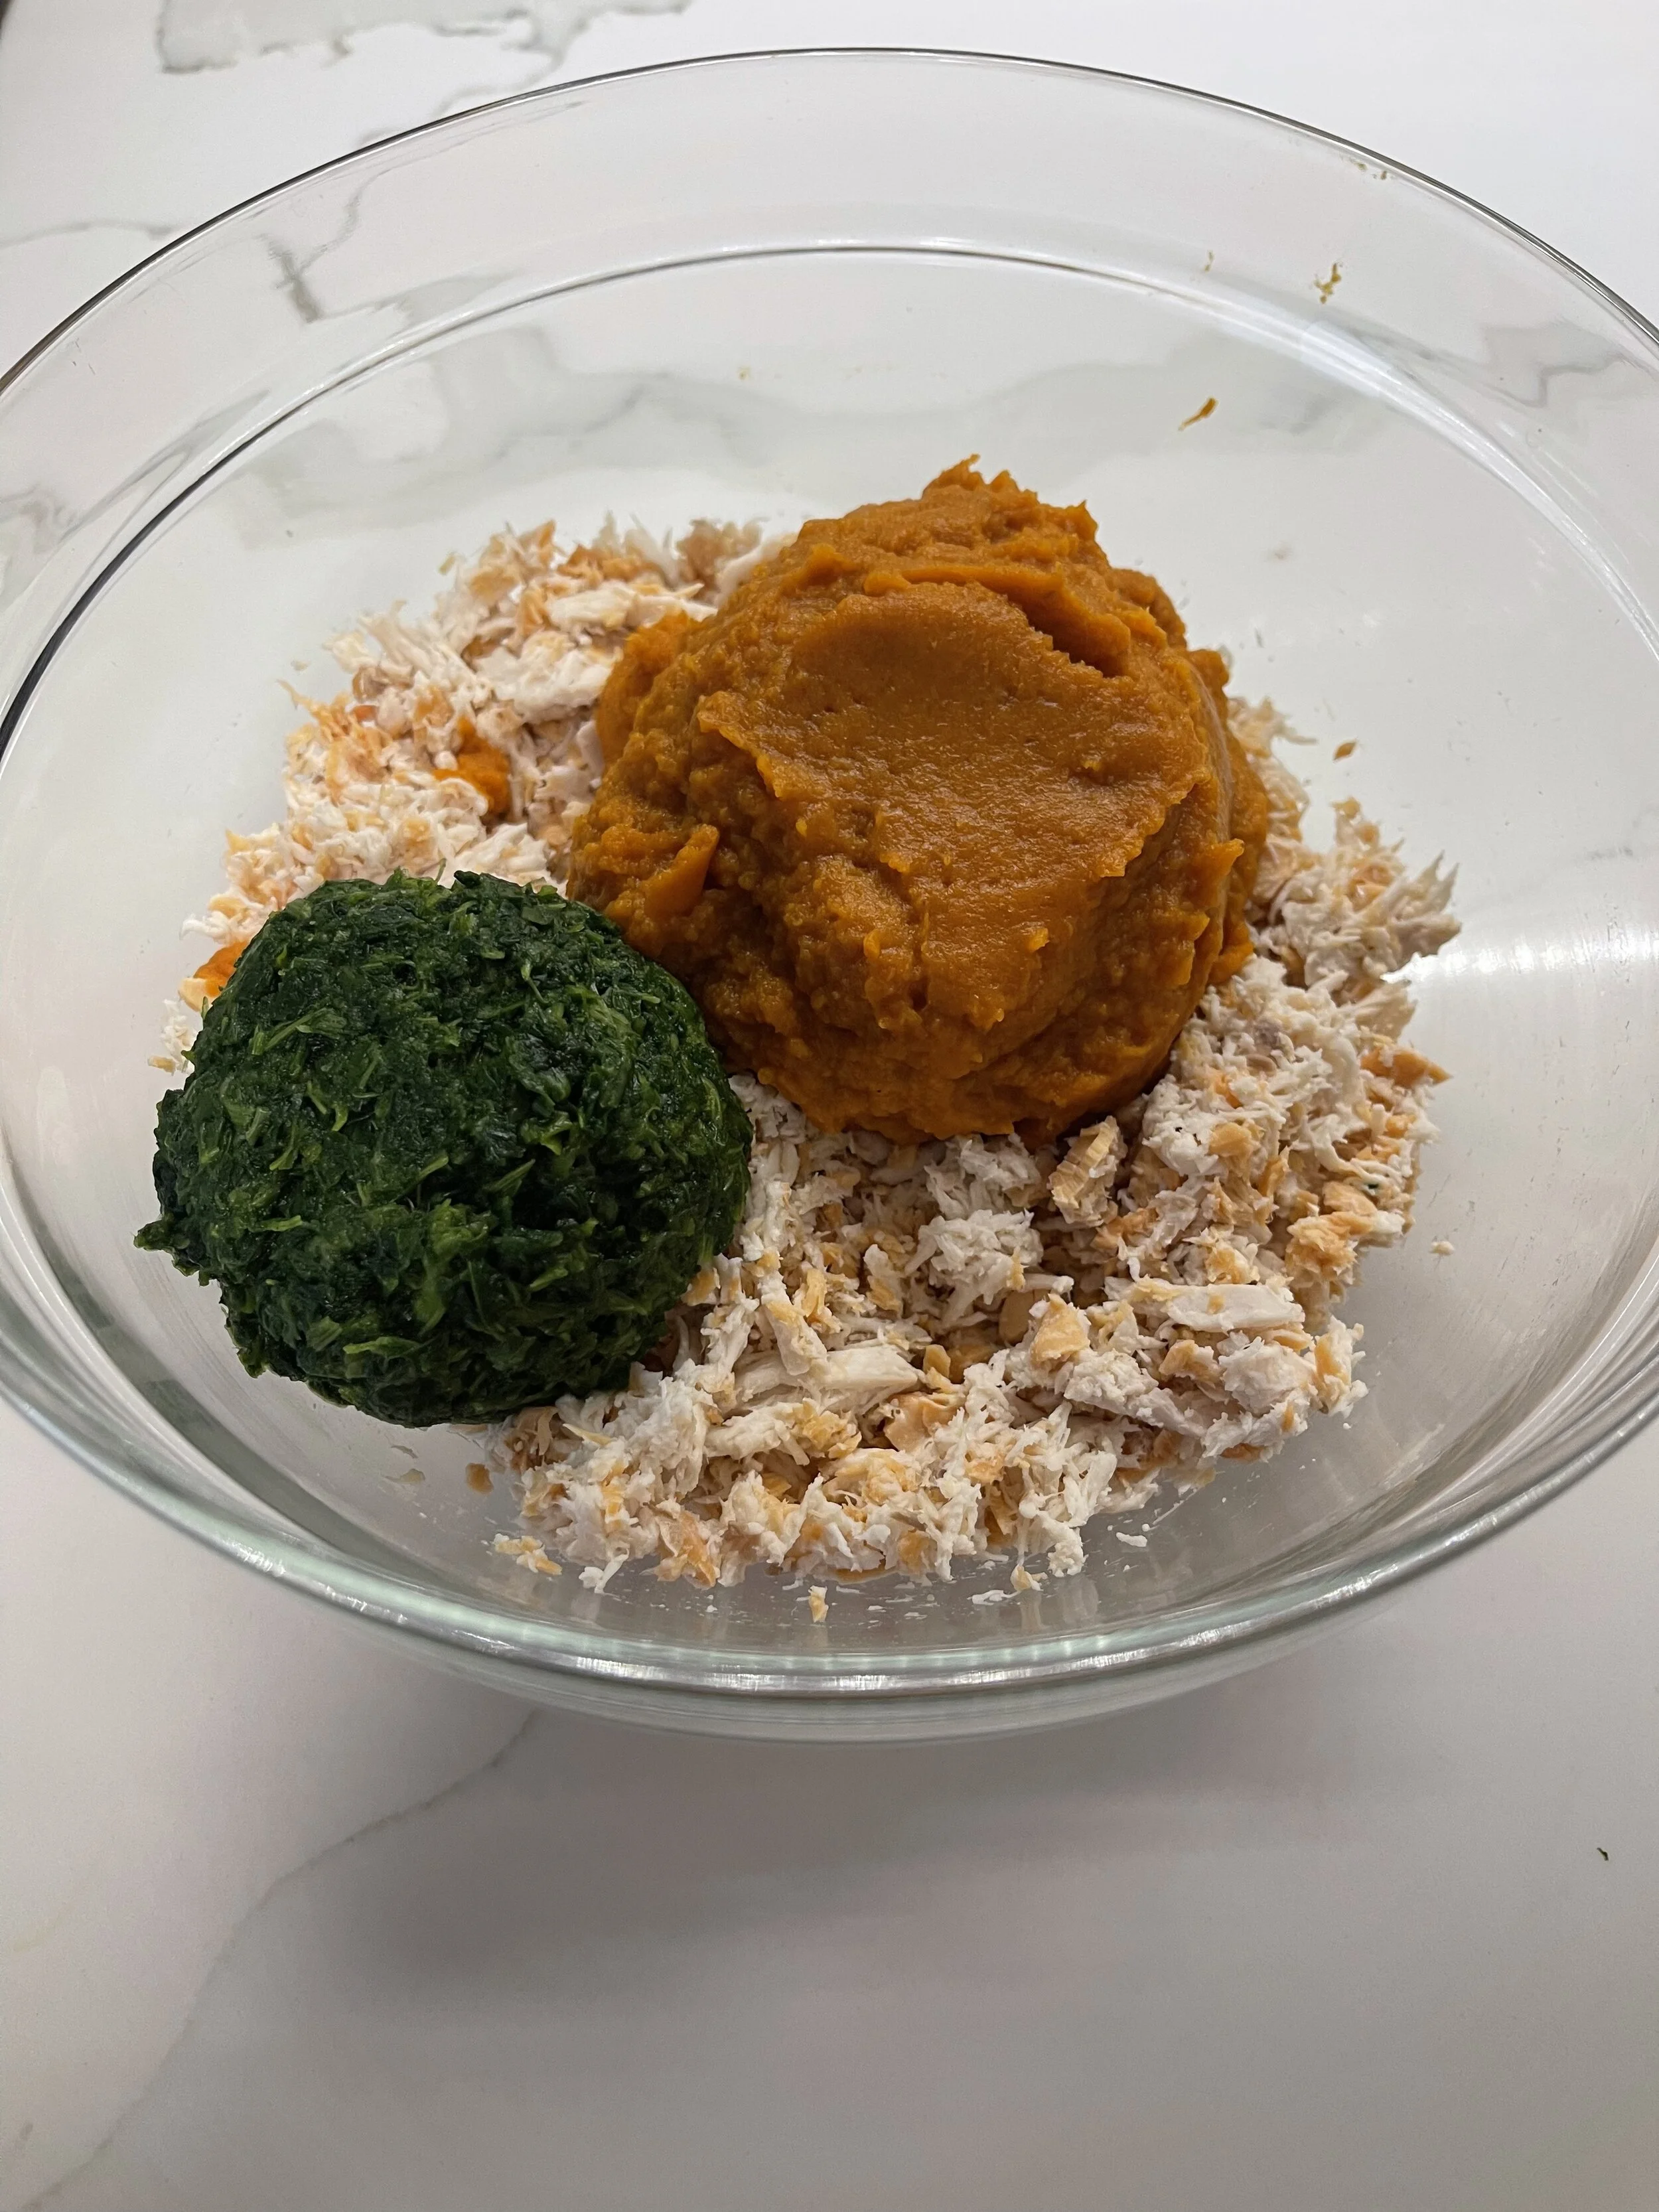
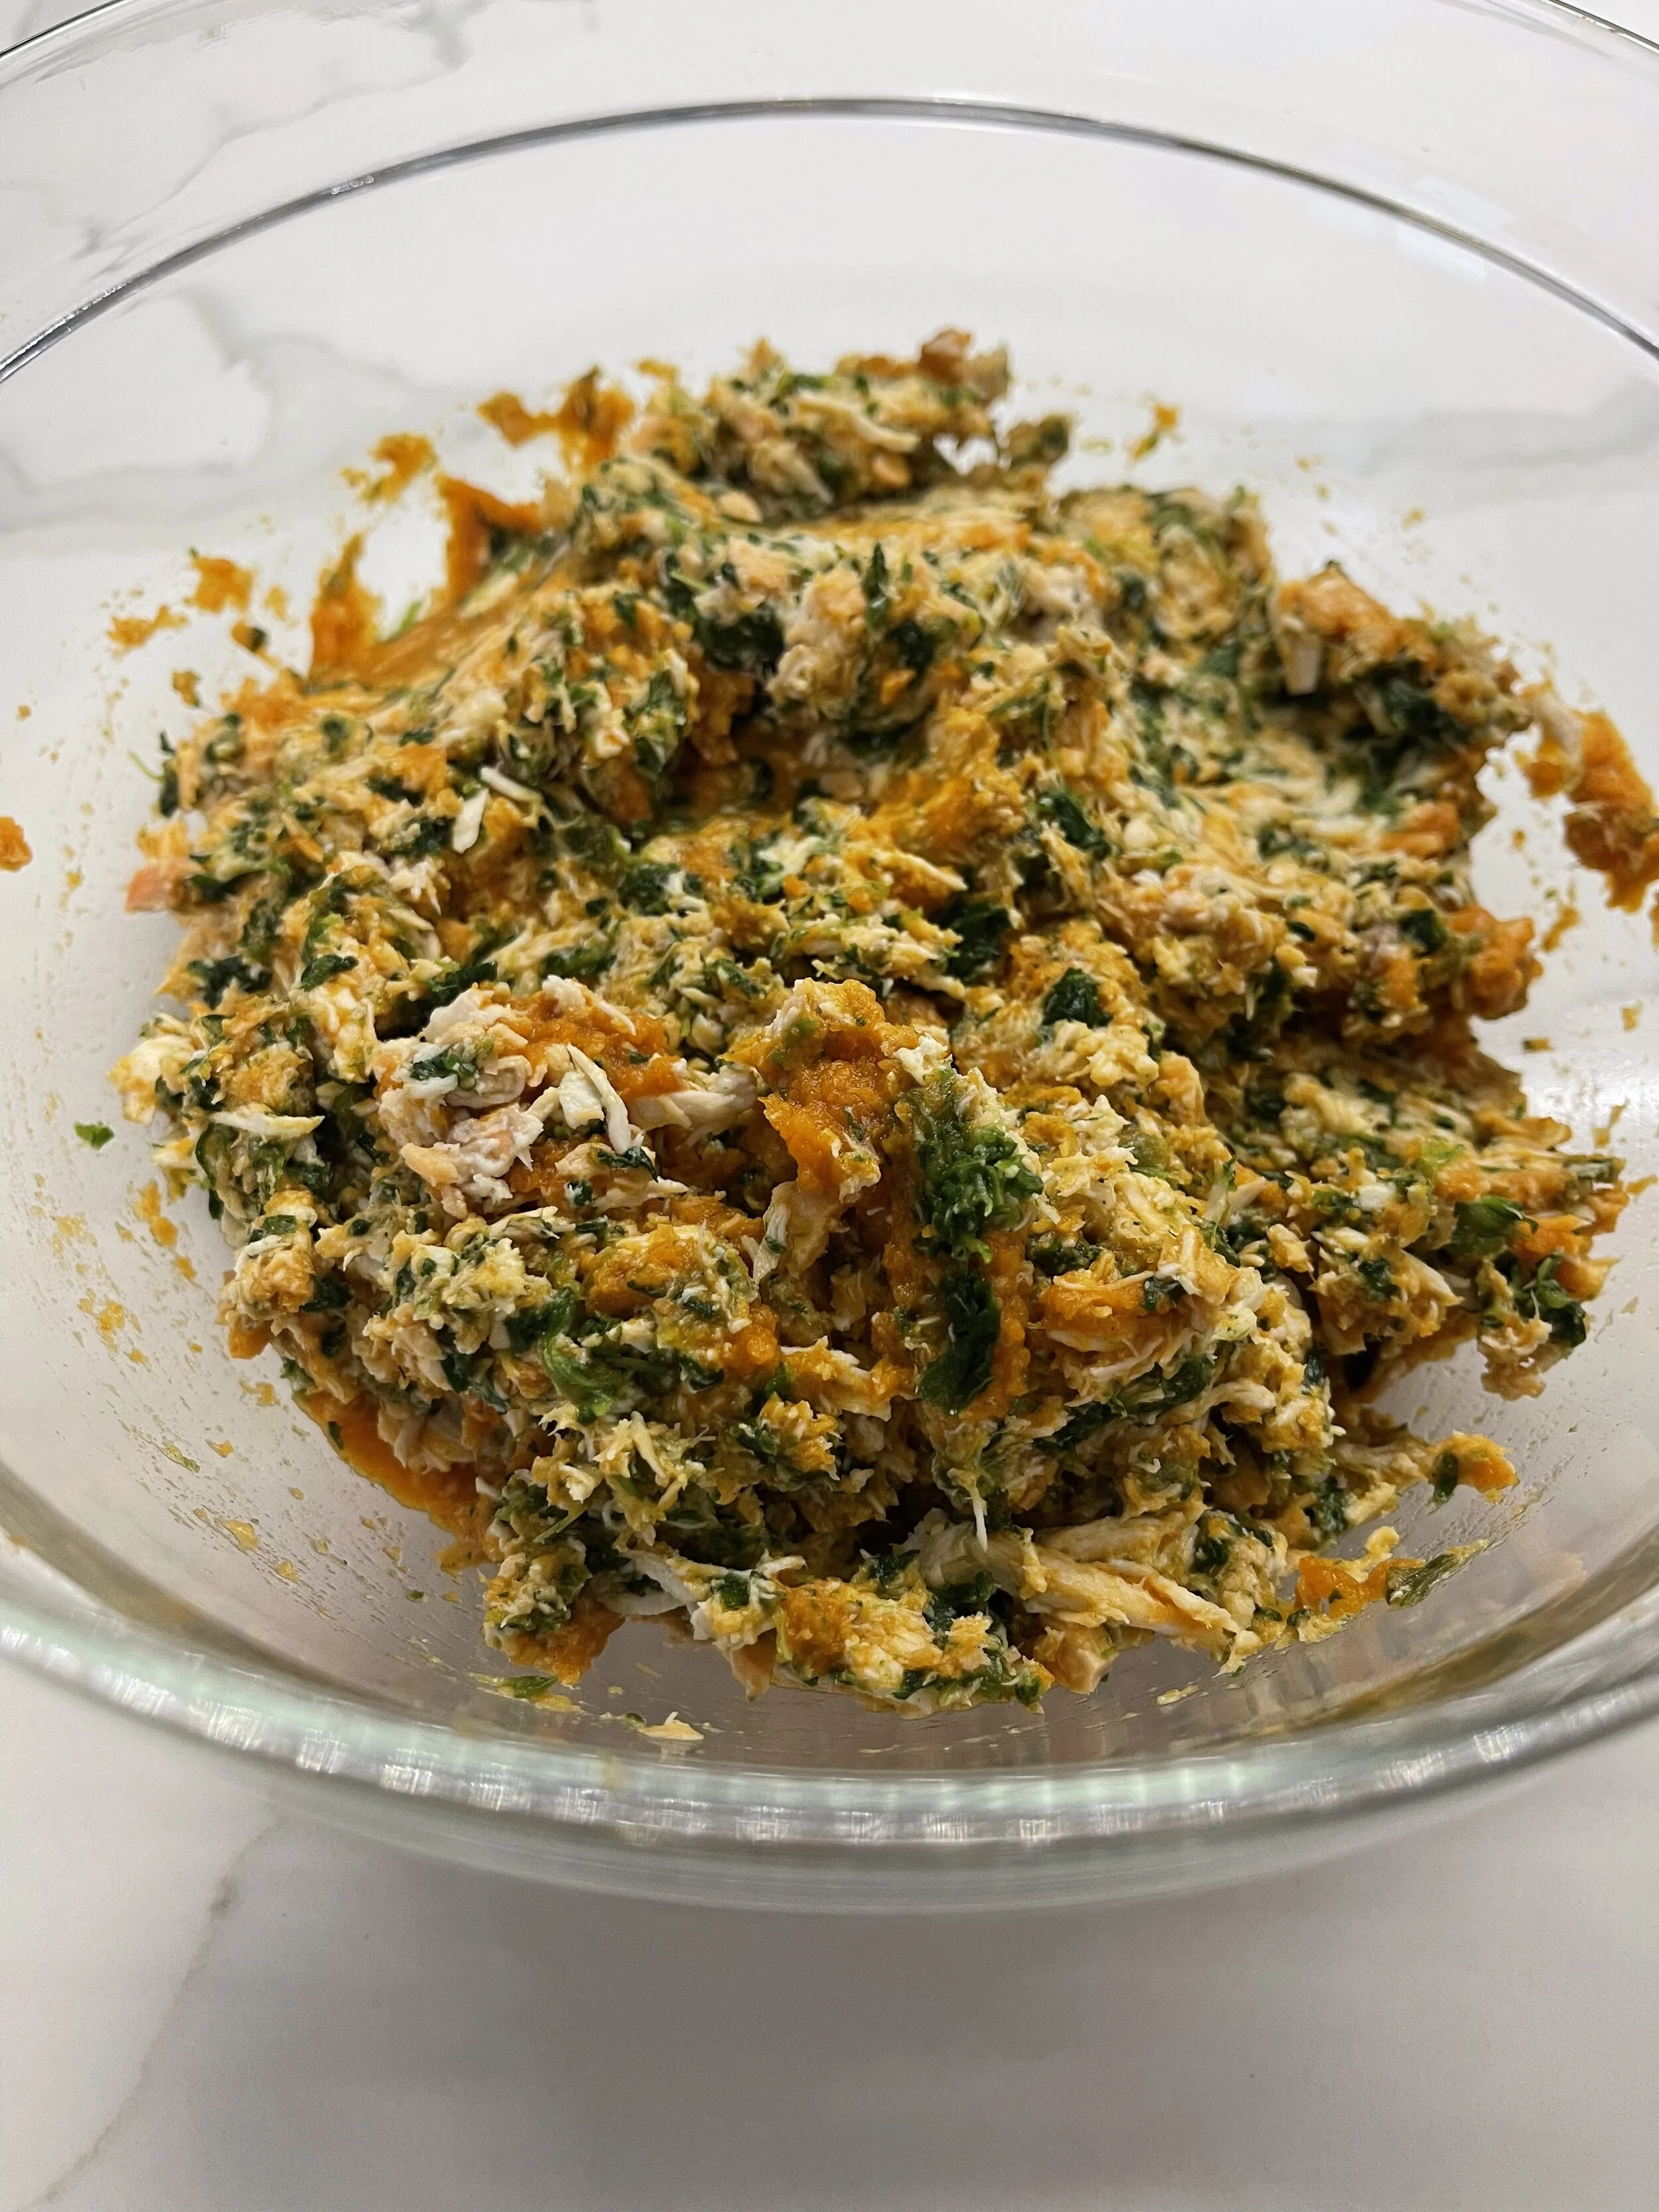
Remove from the pot and shred with a fork in a bowl
Mix in 1 can of salmon and continue shredding until the pieces are nice and small
Add 3/4 cup of pumpkin puree
Add 1/2 cup of spinach (** If using frozen spinach, thaw completely, if using fresh, steam it**)
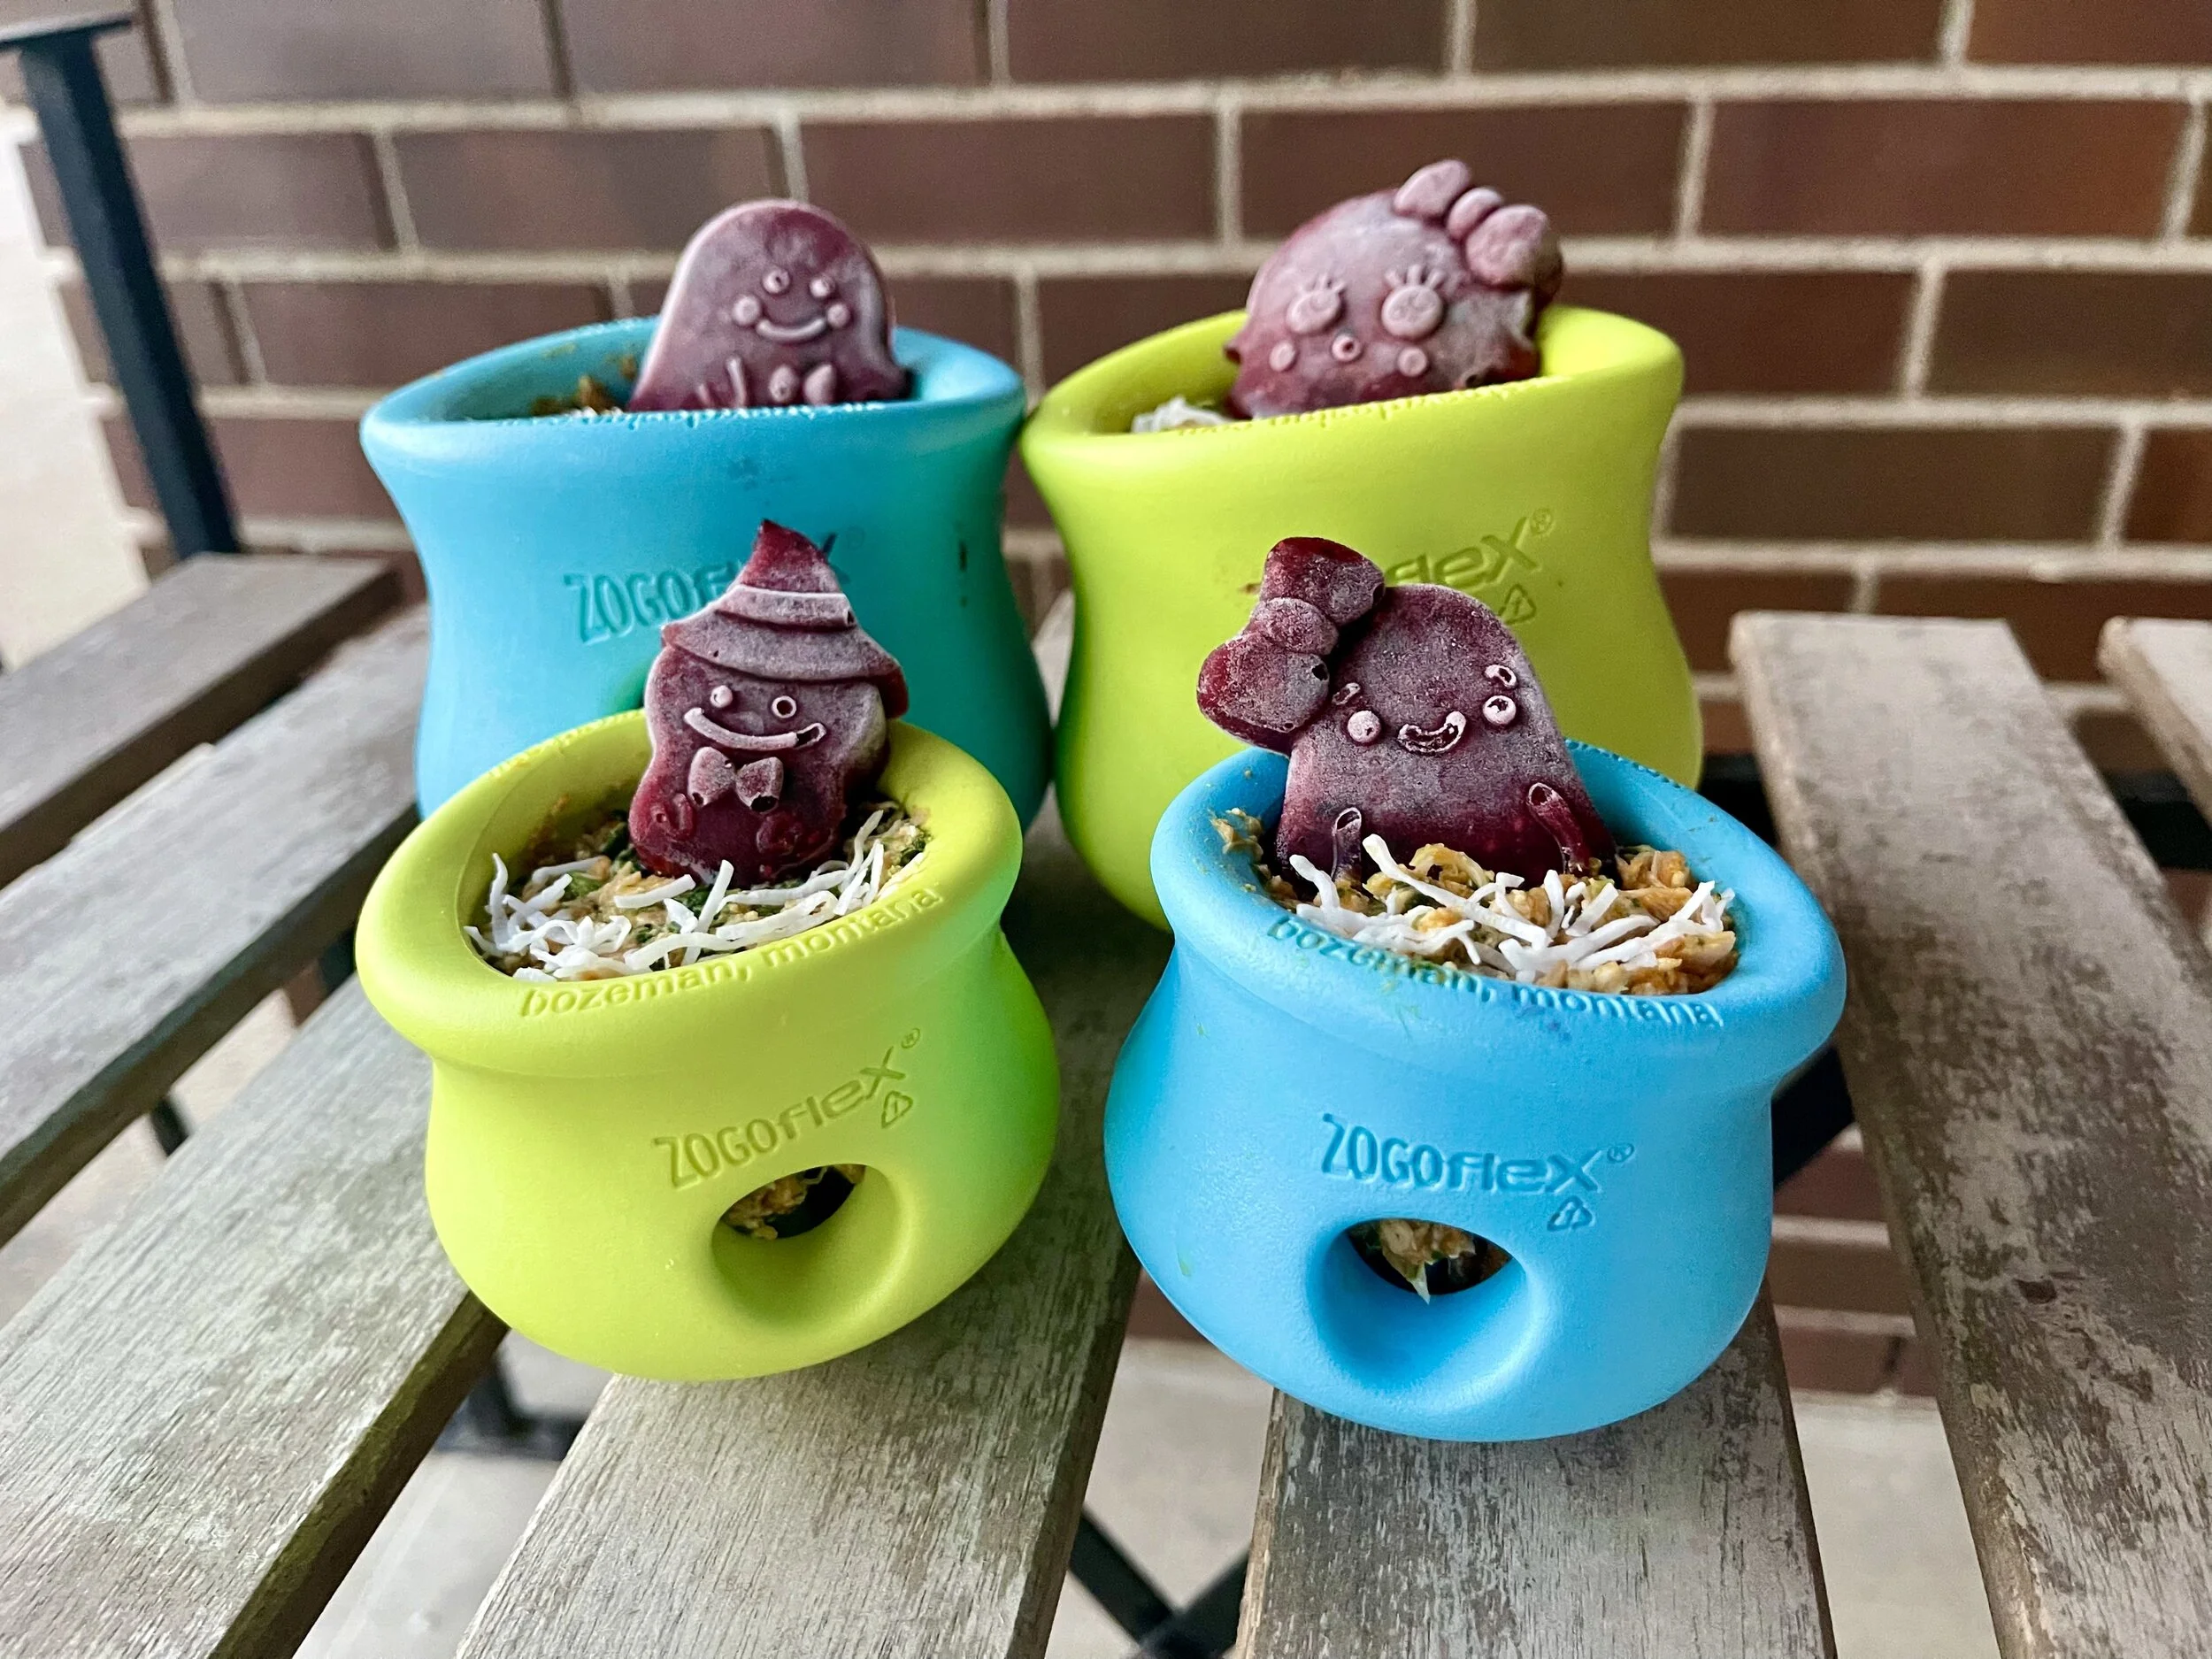
Step Three: Put the mix in the toppl (from step two), add the garnish to the top (from step one), and freeze!
Fill the toppl with the main mixture from step two.
Top the toppl with your cute garnish from step one.
Add your coconut cobwebs to the top as a bonus garnish for added aesthetic!
Serve as is or freeze the whole thing for a long lasting snack!
This recipe is very versatile! You can swap out ingredients for whatever you have available! If you need help finding a substitute, please do not hesitate to reach out!
If you have something that you’d like to DIY for your #TOCFam, please fill out our form here.

DIY: How to Make Your Dog Frozen Meal Toppers
Editor’s Note: This week we are so excited to bring you another edition of our TOC DIY series, brought to you by another wonderful member of our #TOCFam, Allison Jones. Allison lives in Saskatoon, Saskatchewan with her dog, Indy (@indy_inspired on Instagram). She told TOC, “We both adore food and the outdoors! I love using food toppers to keep Indy fueled for our next big hike…I started adding pumpkin to Indy’s meals for more fiber when she started to have mushy poops. It solved that problem but only came in large cans that would take too long to use up. That’s when I decided to start freezing it in cubes so I could store it longer and easily add it to her meals.” Lucky us, Allison’s agreed to share the secret to her frozen toppers so we can make them for our dogs to help spice up their meals and/or introduce some added nutrients. Keep scrolling for all of the steps and ingredient ideas to make your dog frozen meal toppers. [Disclosure: This post may contain affiliate links, meaning TOC may get a commission if you decide to make a purchase through our links, at no cost to you.]

Allison's dog, Indy, is a four year old rescue mix whom she adopted when she was around six months old.
📎 The Supplies You’ll Need to Make Your Dog Frozen Meal Toppers
Your choice of topper
An ice tray. Here’s one TOC found on Amazon.*
A spoon
A freezer bag
Access to a freezer
⏰ Time Commitment
Five minutes of prep
Two hours minimum in the freezer
✅ Step by Step: How to Make Your Own Frozen Meal Toppers
Get your choice of topper and do any cooking or blending needed (not always required) to get it into the desired consistency. You can buy pre-made mixes at a pet store or use something dog safe from a grocery store (like canned pumpkin!). A quick search online will give you other ideas, but here are some ingredients you could use: goat’s milk, yogurt, banana, sweet potatoes, carrots, blueberries, apples, bone broth, etc. For me, it’s about adding healthy whole foods (instead of treats like cheese or peanut butter) but it’s also thrifty! I make sure to dump the bottom dust/crumbles from a treat or kibble bag into a topper. (Note: before you make these, if your dog has allergies, be sure to consult with your veterinarian for advice).
Using a spoon, portion a bit of your topper into each section of the ice tray. Depending on consistency, you may want to add water.
Place the tray(s) in the freezer for at least two hours.
Once fully frozen, you can pop the cubes out of the tray and into a freezer bag for easy access at meal times. (A note on why I freeze these: I once bought a frozen bottle of goat’s milk to try adding it to Indy’s meals. After taking it home, I saw on the bottle that it needed to be used within a few days of thawing. I wanted Indy to get the benefit of probiotics but not have to go through a bottle every few days! Freezing that in ice tray sized portions allowed me to use a bottle a month.)
If you have something that you’d like to DIY for our #TOCFam, please fill out our form here.
*Disclosure: This post may contain affiliate links, meaning TOC may get a commission if you decide to make a purchase through our links, at no cost to you.
PS: Pin this post for later!


DIY: Make Your Dog a Squeeze Tube Fruit Smoothie
Editor’s Note: This week we are elated to bring you another installment for our #TOCDIY series, featuring our latest diy-er, Kira Burkhart, and her mini American Shepherd, Bailey (@wigglebutt_bailey on Instagram). Kira told TOC, “We love to go for nature walks and practicing recall, but it's a lot less fun handling stinky high value rewards with cold fingers. We started making these [squeeze tube smoothies] for snowy, windy, cold weather walks.” Keep scrolling for all of the steps to make your dog their very own squeeze tube fruit smoothie. [Disclosure: This post may contain affiliate links, meaning TOC may get a commission if you decide to make a purchase through our links, at no cost to you.]
📎 The Supplies You’ll Need to Make Homemade Squeeze Tube Fruit Smoothies

Kira told TOC that Bailey’s absolute favorite walks are in the snow. “He would stay in the snow forever if he could, so squeeze tube smoothies are perfect when mittens or gloves are a must!”
Dog friendly fruit (e.g. bananas, raspberries)
Greek yogurt
Peanut butter
Water (as needed for getting the right texture)
A blender
A squeeze tube for the treat (e.g. travel sized toiletry bottles). You can find these in the travel toiletry section at the grocery store, CVS, or get them on Amazon.*
⏰ Time Commitment
Prep time: five minutes
✅ Step by Step: How to Make Your Dog Squeeze Tube Fruit Smoothie
Step One: Throw some dog-friendly fruit into the blender (e.g. one banana, a handful of raspberries or strawberries).
Step Two: Add two heaping spoonfuls of greek yogurt (or skip the dairy if your dog has a sensitive stomach).
Step Three: Add two spoonfuls of peanut butter.
Step Four: Blend until smooth! You can add some water if you want a thinner texture/consistency.
Step Five: Pour the smoothie into the squeeze tube.
Step Six: Treat your dog!
If you have something that you’d like to DIY for our #TOCFam, please fill out our form here.
*[Disclosure: This post may contain affiliate links, meaning TOC may get a commission if you decide to make a purchase through our links, at no cost to you.]
PS: Pin this post for later!


DIY: How to Make Salmon Dog Treats
Editor’s Note: This week we are SO happy to bring you the latest installment in our #TOCDIY series, featuring homemade salmon dog treats! This week’s diy-er is Meg Lucas, a member of our #TOCFam, along with her dog, Teddy (or Ted for short), a 16-month-old Border Terrier (@token.ted on Instagram). Meg told us Ted is, “The most happy-go-lucky dog we've ever met, and we *love* his personality.” Keep scrolling for the easy AND inexpensive salmon treat recipe that Ted loves! [Disclosure: This post may contain affiliate links, meaning TOC may get a commission if you decide to make a purchase through our links, at no cost to you.]
📎 The Supplies You’ll Need to Make Homemade Salmon Dog Treats

“We live in London, UK so Ted's a rural breed with an urban lifestyle. When we're not in lockdown 😅 my partner Sam and I love traveling around the UK with Ted. But right now we keep him busy with 'truffle hunting' (we hide a cotton pad with a drop of truffle oil around the house for him to find), training, and various enrichment activities involving the contents of our recycling bin” Meg told TOC.
One tin of canned salmon* (or any dog-safe canned fish/meat)
One tablespoon of chickpea flour (or any flour of your choice)
A silicone mat (we use a semi-sphere silicone baking mat with indents). Here’s one TOC found on Amazon.*
An oven or dehydrator
*Never feed raw Pacific salmon.
⏰ Time Commitment
Prep time: five minutes
Dehydrating time: three to four hours (don’t worry - you can work on other things at the same time)
✅ Step by Step: How to Cook Your Own Salmon Dog Treats
Mix together salmon and chickpea flour until you have a smooth paste (the texture of a mashed potato).
Smear the paste into your chosen molds.
Dehydrate in an oven or dehydrator for three to four hours at 70°C or 158°F.
Store in an airtight container for one week or freeze in portions.
If you have something that you’d like to DIY for our #TOCFam, please fill out our form here.
*Disclosure: This post may contain affiliate links, meaning TOC may get a commission if you decide to make a purchase through our links, at no cost to you.
PS: Pin this post for later!

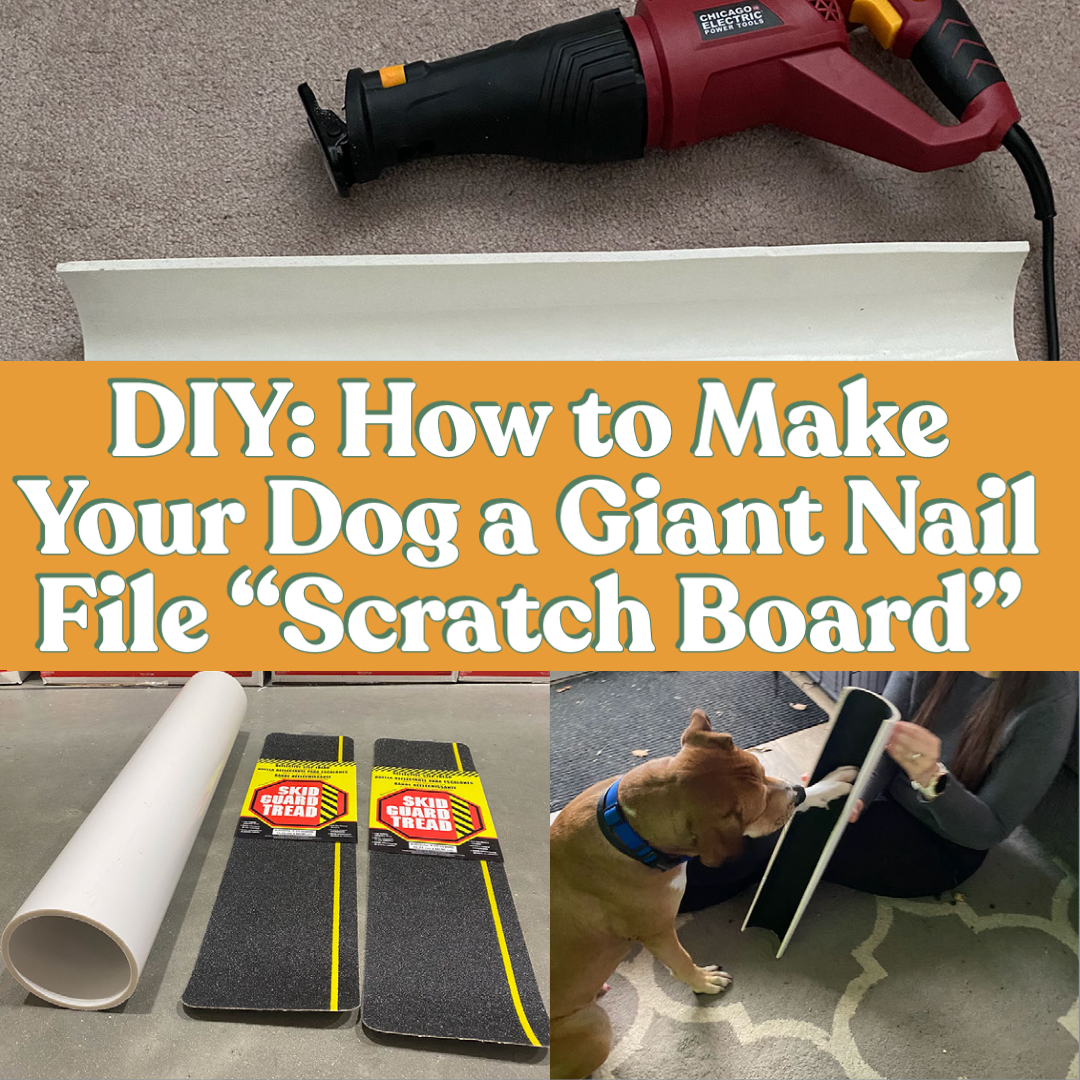
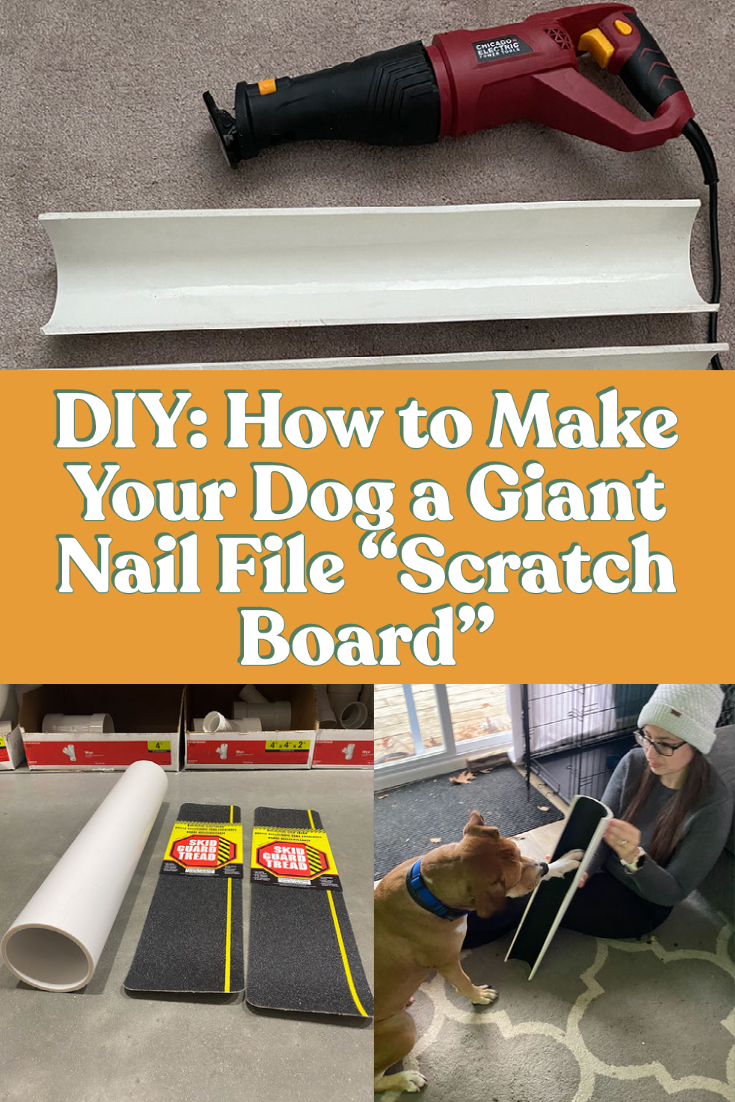
DIY: How to Make Your Dog a Giant Nail File “Scratch Board”
Editor’s Note: This week’s TOC DIY is brought to you by Erika Fields and her hound dog, Mack. Erika told TOC, “Mack was born in Alabama but his rescue brought him up to Massachusetts, where he lives now. He loves winters (snow zoomies!) and hates summers — we’re complete opposites in that respect.” In order to help keep Mack’s nails short and avoid frequent nail clippings (he’s not a big fan of having his paws touched), Erika made him a DIY scratch board, which is basically a giant dog nail file. Now she says that Mack loves nail time and they use the scratch board during training sessions, which Mack adores as long as he can have part of his dinner in the process! To learn the steps to make your own DIY scratch board, keep scrolling below.
📎 The Supplies That You’ll Need to Make DIY Scratch Boards
![“Mack has two trick titles and we’re working on his third (expert level)! He’s a mutt through & through but his hound nose is what started us on our journey of [also] making snuffle mats. Mack has yet to find a type of food he doesn’t love. Food…](https://images.squarespace-cdn.com/content/v1/5cfec609958de40001253e1d/1605639115472-KOMG6QSECOB7OU46V5KX/Erika+sits+on+a+bench+with+her+dog+Mack)
“Mack has two trick titles and we’re working on his third (expert level)! He’s a mutt through & through but his hound nose is what started us on our journey of [also] making snuffle mats. Mack has yet to find a type of food he doesn’t love. Food is definitely the way to his heart (like mine!),”Erika tells TOC.
One 4 inch wide pvc pipe (found at most local hardware stores like Lowe’s and Home Depot)
3M stair treads or 80 grit sandpaper
Double sided tape/similar adhesive (you won’t need this if you’re using the 3M stair treads)
Reciprocating saw (a handheld saw could probably work too)
⏰ Time Commitment
The scratch board will take you roughly 15 minutes to make.
⚖️ Skill Level
Making this scratch board should be relatively easy!
✅ Step by Step: How to Make Your Own Scratch Board

Step One
First you need to cut the pvc pipe in half. I’ve used a reciprocating saw, but a handheld saw could probably work too.
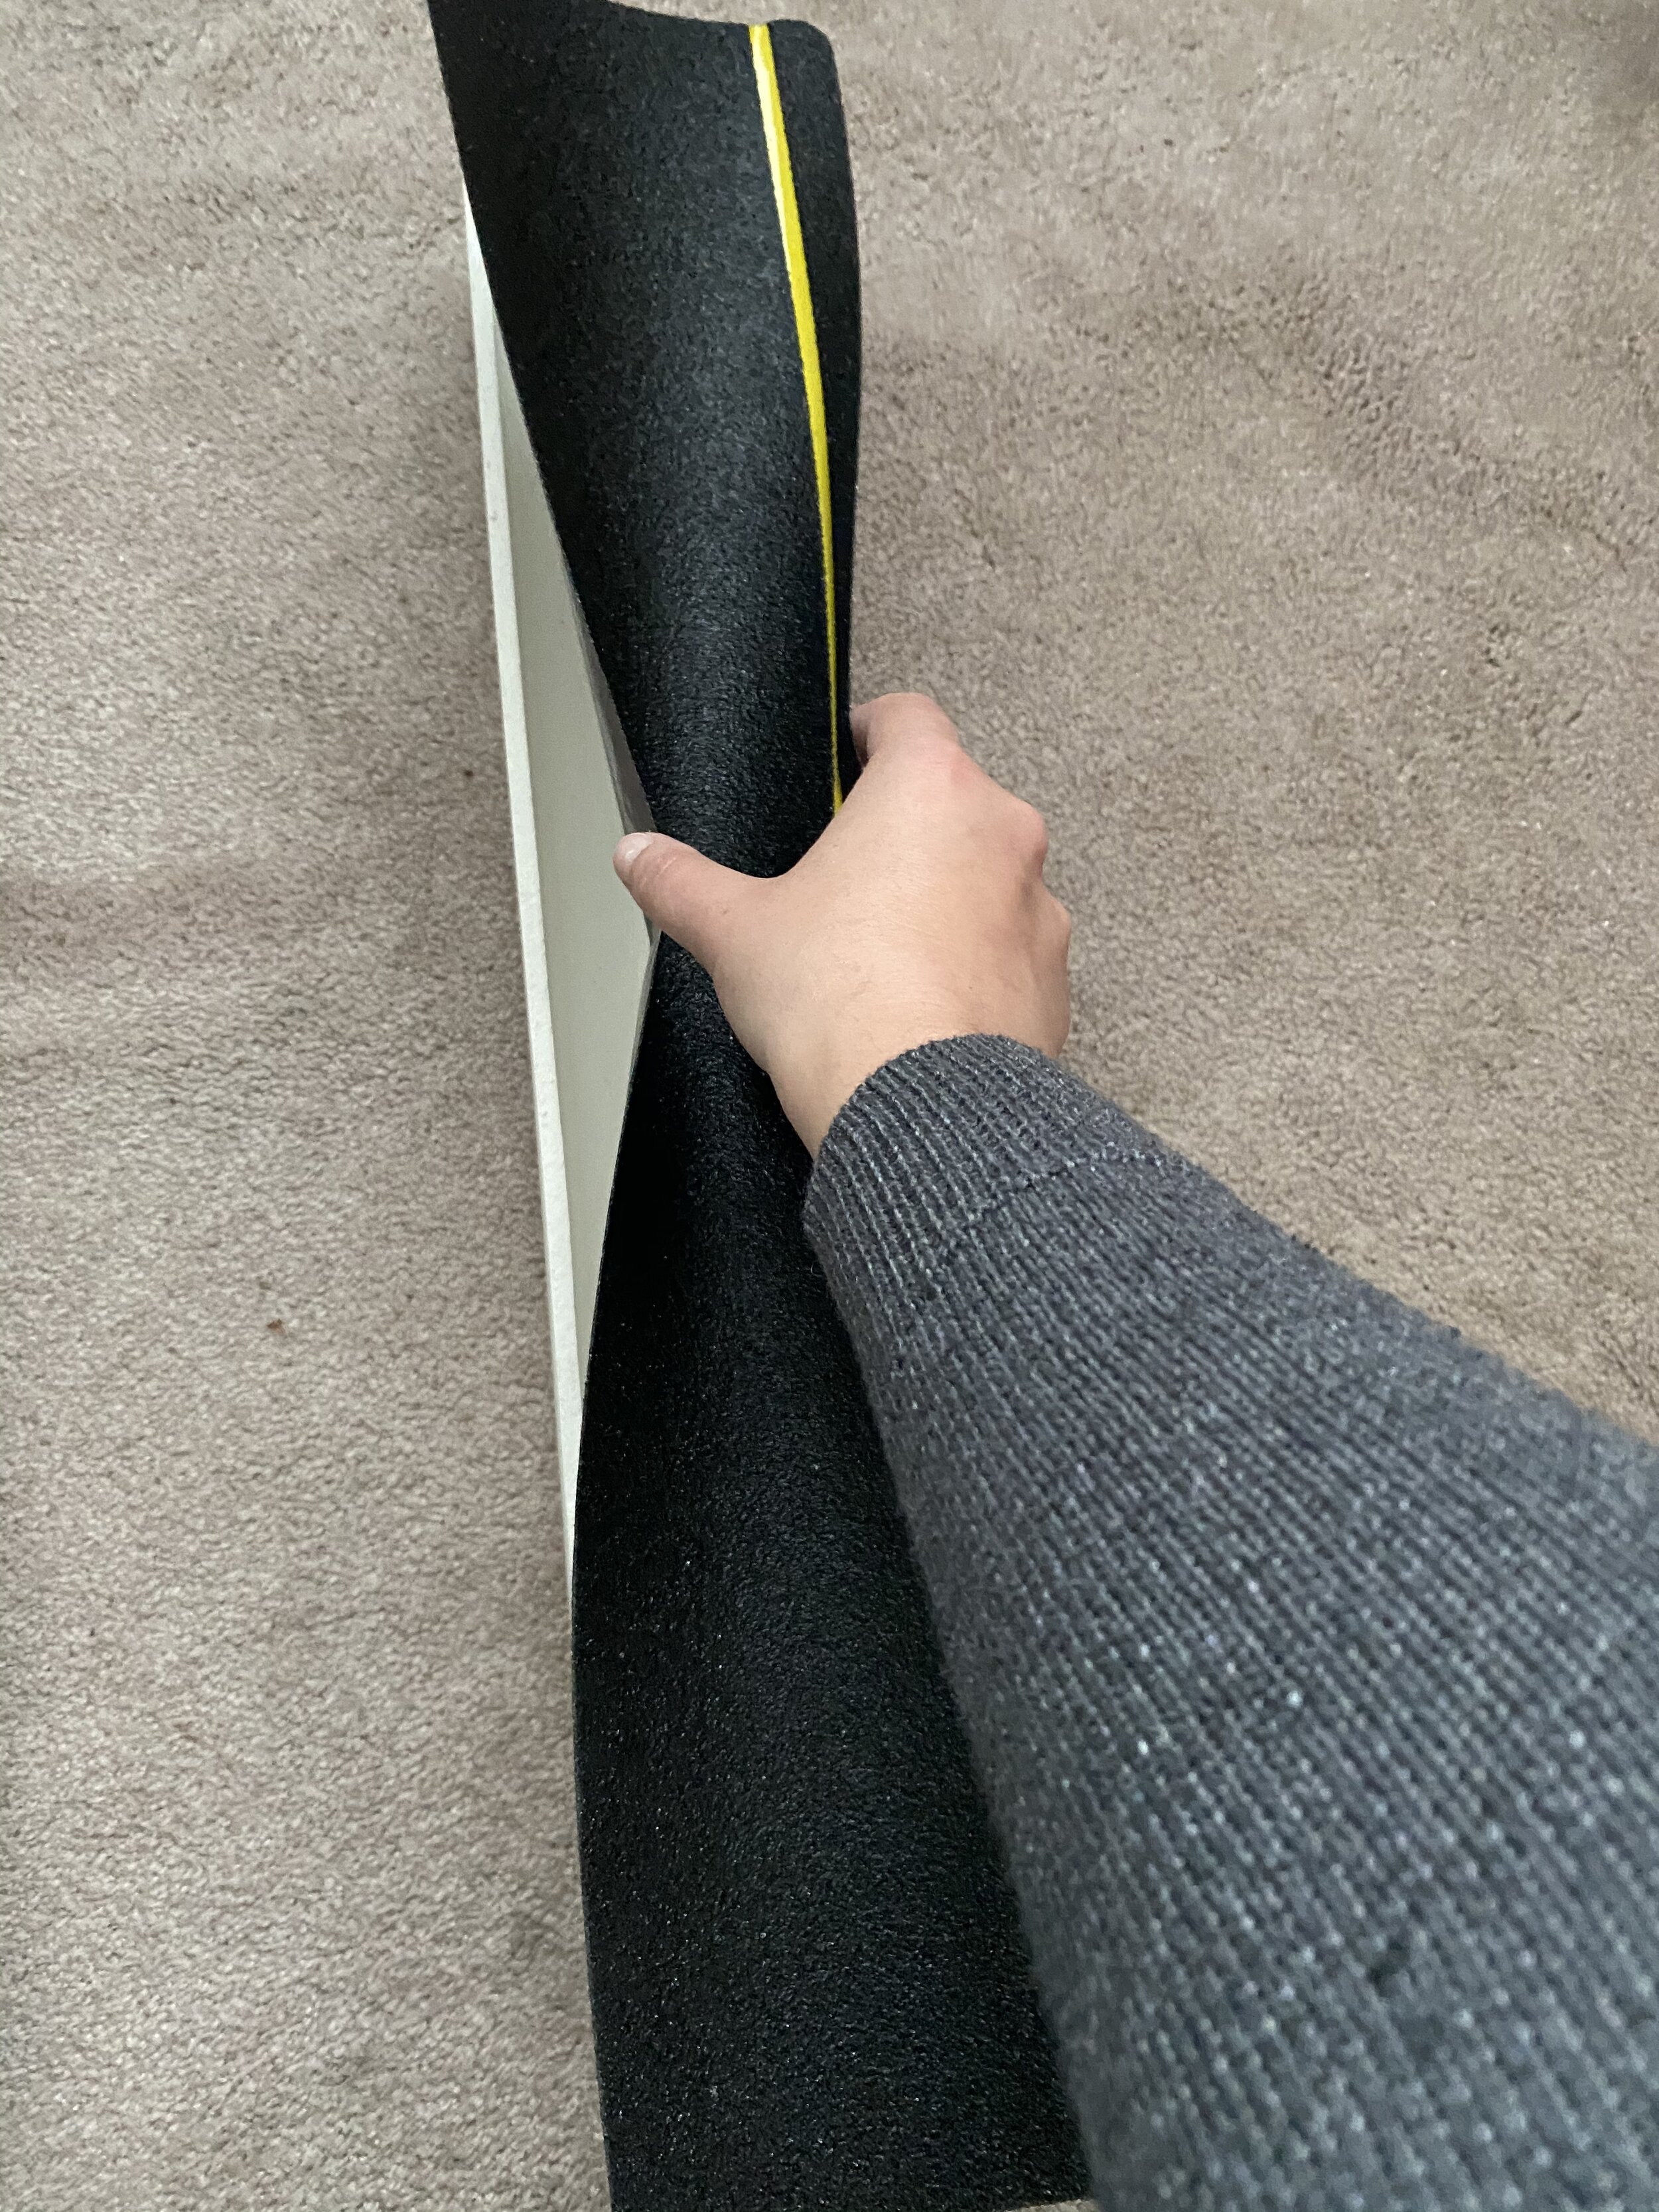
Step Two
Once you have the pvc cut in half, you just need to adhere the 3M stair tread to the inside of the pipe. These come with self-adhesive so you just line it up and press it against the pipe.

Step Three
If you are using sandpaper, you’ll need to cut the sandpaper to fit the inside of the pipe then put adhesive of your choice on the back of the sandpaper before you can stick it to the pipe.

Step Four
Grab some treats and invite your dog to start filing down their nails on their own!
If you have something that you’d like to DIY for your #TOCFam, please fill out our form here.

DIY: How to Make Your Own Dog Collar

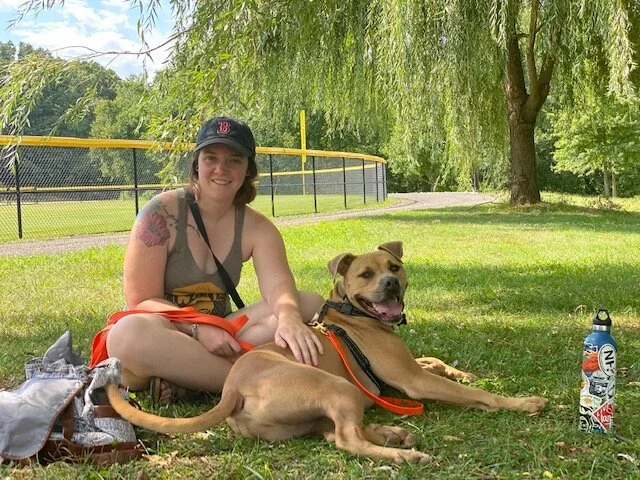
Editor’s note: This week’s edition of #TOCDIY is brought to you by another amazing member of our #TOCFam, Suzie Stephenson. Suzie has two medium goldendoodle half-siblings named Tashmoo and Wrigley. No big deal but she also happens to be a PhD student in virology! (This community truly blows us away). Somewhere along the way she picked up sewing as a hobby so she could sew herself clothes. “Now I mostly sew dog collars, as well as make my two [dogs] their Halloween costumes,” she tells TOC. These days Suzie also sews collars for a small business she started with her friend called, Stitches for Steak, and today she is going to teach us how to make our own collars at home! Keep scrolling for all of the steps to follow to make your own collar, along with a discount code to buy one from Suzie’s small business!
📎 The Supplies That You’ll Need to Make Homemade Dog Collars

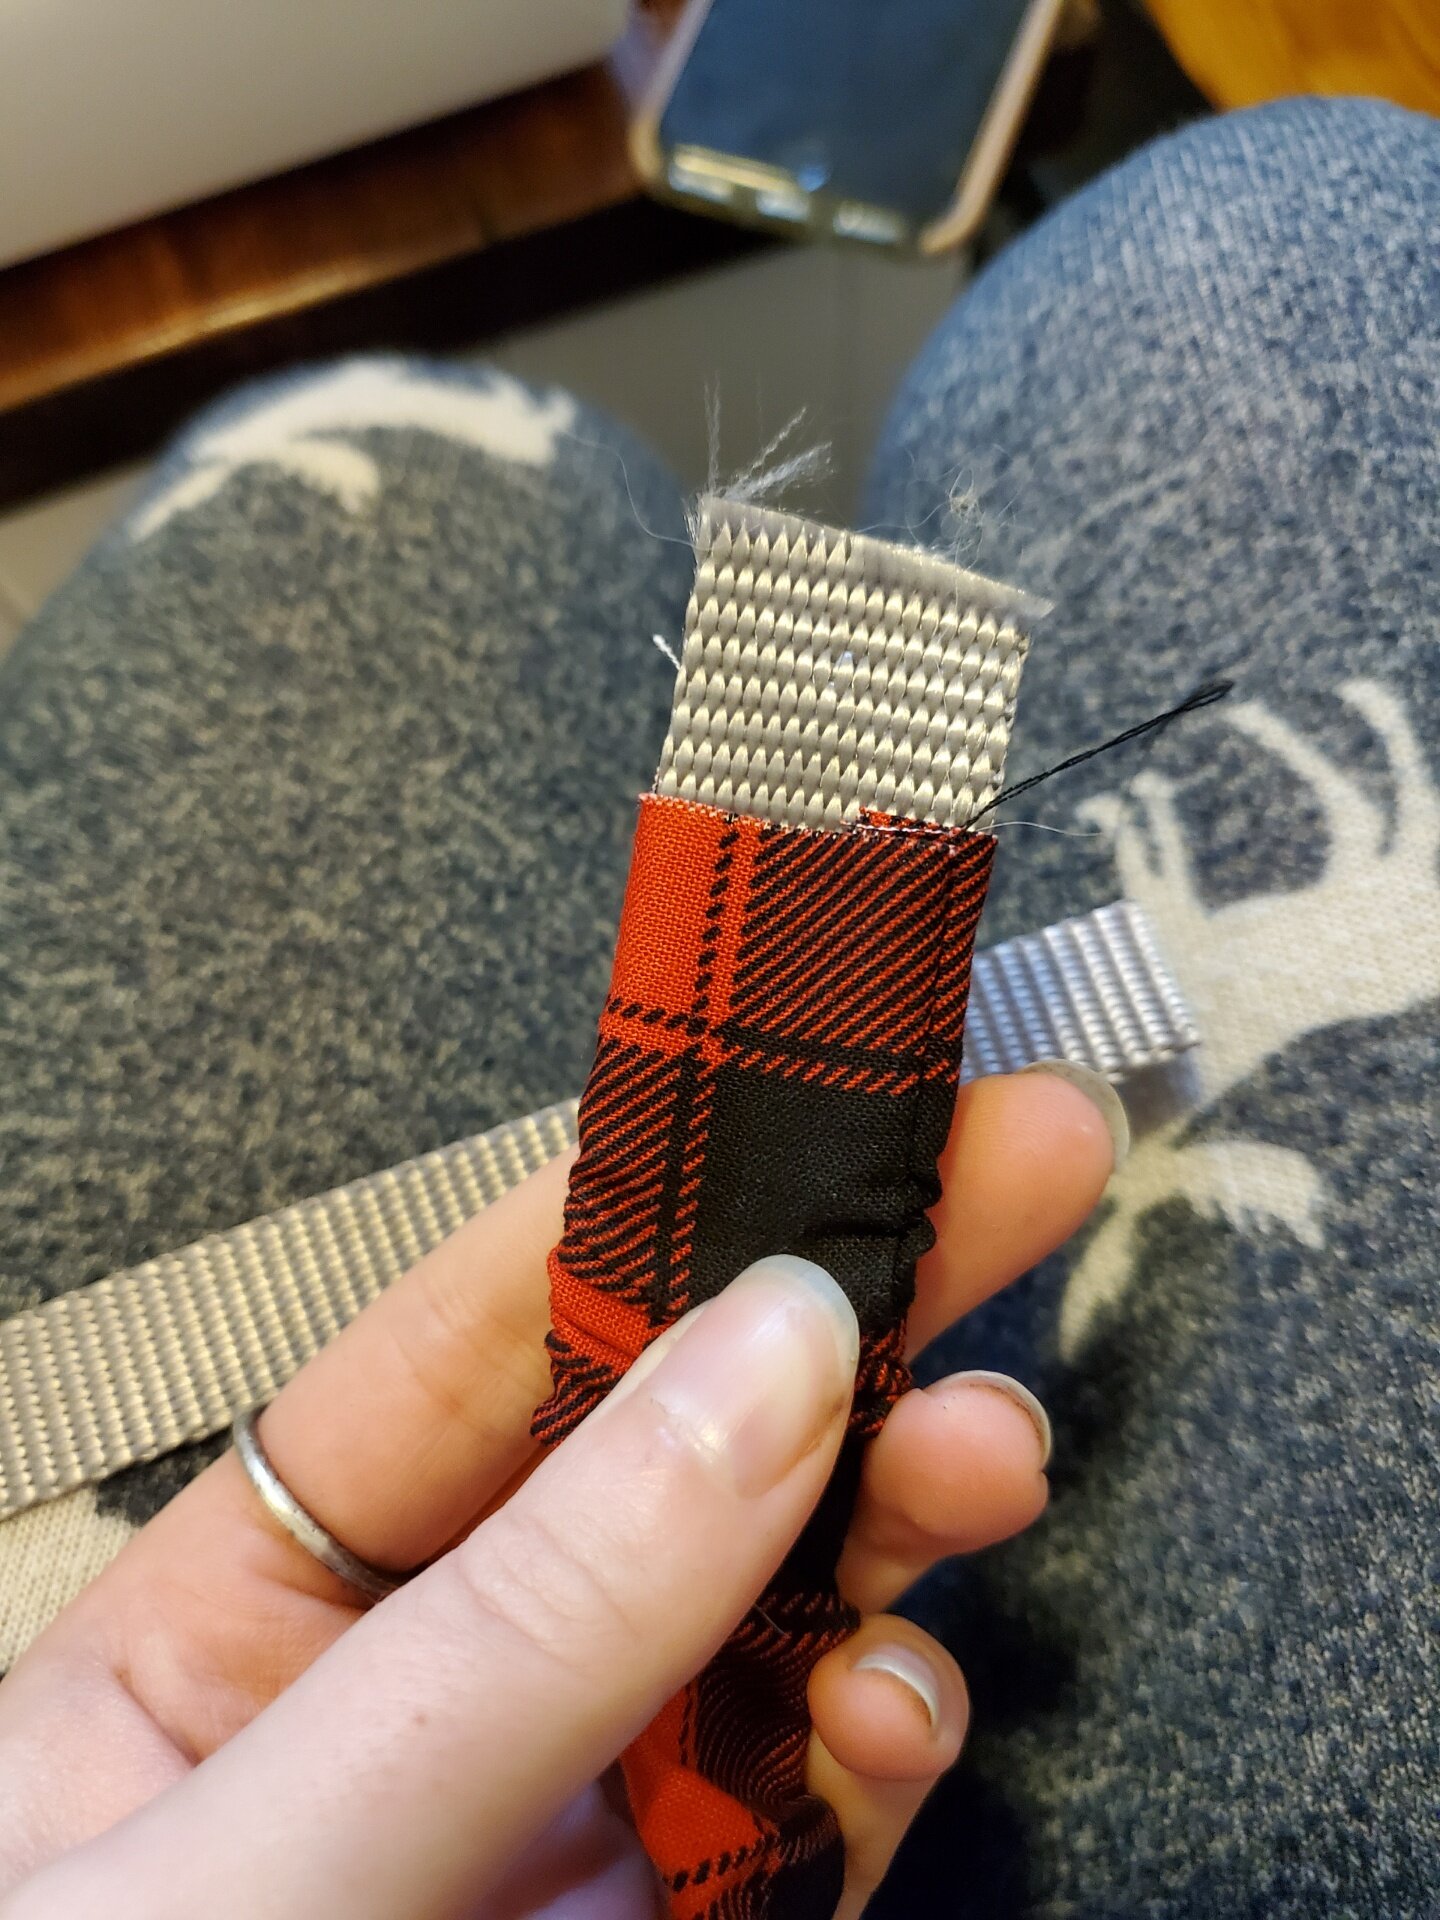
“Tashmoo and Wrigley (above with Suzie) are half-siblings who enjoy snuggling with us, each other and their toys (especially Tashmoo's toy possum),” Suzie tells TOC.
Quilting cotton
Heavy nylon webbing in preferred size (1", 3/4", 5/8", etc)
Sewing machine
Thread
Scissors or rotary cutter
Cutting mat
(Optional) Wide metal straw and skewers
(Optional) Large safety pin
⏰ Time Commitment
This can take an hour if it’s your first time and you haven't pre-cut the fabric. It usually takes me about 20-30 minutes for one collar.
⚖️ Skill Level
This project is for intermediate sewists, so it’s probably hard for someone who has never sewn before!
✅ Step by Step: How to Make Your Own Dog Collar
Cut fabric to appropriate size (about 3" x desired length)

Cut webbing to appropriate size (about 2.5" shorter than the fabric length)

Sew (using a straight stitch and regular thread) fabric right-sides together to form a fabric tube

Turn fabric tube right-side out (using optional tools)

Thread webbing into fabric tube (with safety pin) such that the seam is on the edge of the webbing on one side
Sew (using a straight stitch, regular thread and your needle all the way over) the fabric tube onto the webbing on each side

Thread the triglide onto the collar and box stitch (using topstitching thread) to attach

Thread one half of the buckle onto the collar and thread the collar through the triglide

Thread the D ring and the other half of the buckle onto the remaining free end and box stitch to attach using topstitching thread

10. Straight stitch (going forward and reverse a few times) to hold the D ring in place using topstitching thread

Put your collar on your dog and marvel at how amazing they look in their you-made collar

If this is too advanced of a DIY project for you or you don’t have a sewing machine, you can purchase Suzie’s custom collars and bandanas here. Use code TASHMOO15 for a 15% discount!
If you have something that you’d like to DIY for your #TOCFam, please fill out our form here.

DIY: How to Make Your Dog Homemade Training Treats

Editor’s note: We are very excited to bring you this week’s edition of #TOCDIY brought to you by another amazing member of our #TOCFam, Erica Mello. For the last two years, Erica’s shared her life with her Pitbull mix, Bear, who she says is the most lovable creature, has a personality like no other, and struggles with reactivity. She decided to start making her own treats for Bear “after getting really tired of buying the same overpriced "training treats" from the stores, only for them to not really motivate Bear as much as say - cheese!” Her homemade treats feature ingredients that Bear LOVES and best of all he likes them just as much as that slimy cheese. “It has definitely helped our budgeting but ALSO with our training success” she tells TOC. Keep scrolling to see the steps that you can follow to make Erica and Bear’s treats. [Disclosure: This post may contain affiliate links, meaning TOC may get a commission if you decide to make a purchase through our links, at no cost to you.]
📎 The Supplies That You’ll Need to Make Homemade Dog Training Treats
Tools
Erica, seen above with her Pitbull mix, Bear, tells TOC, “Bear is a dog that just loves to love, he just doesn't always know the right way to do it. He's come SO far within the past year though and it just makes me the happiest watching him thrive more and more in this world!”
Food processor
Blender
Mixing bowl
Mixing tool
Plastic bag
Measuring cups
Sheet tray
Silicon mold (here’s one option I bought on Amazon)*
Ingredients
10oz can of canned chicken
2 eggs
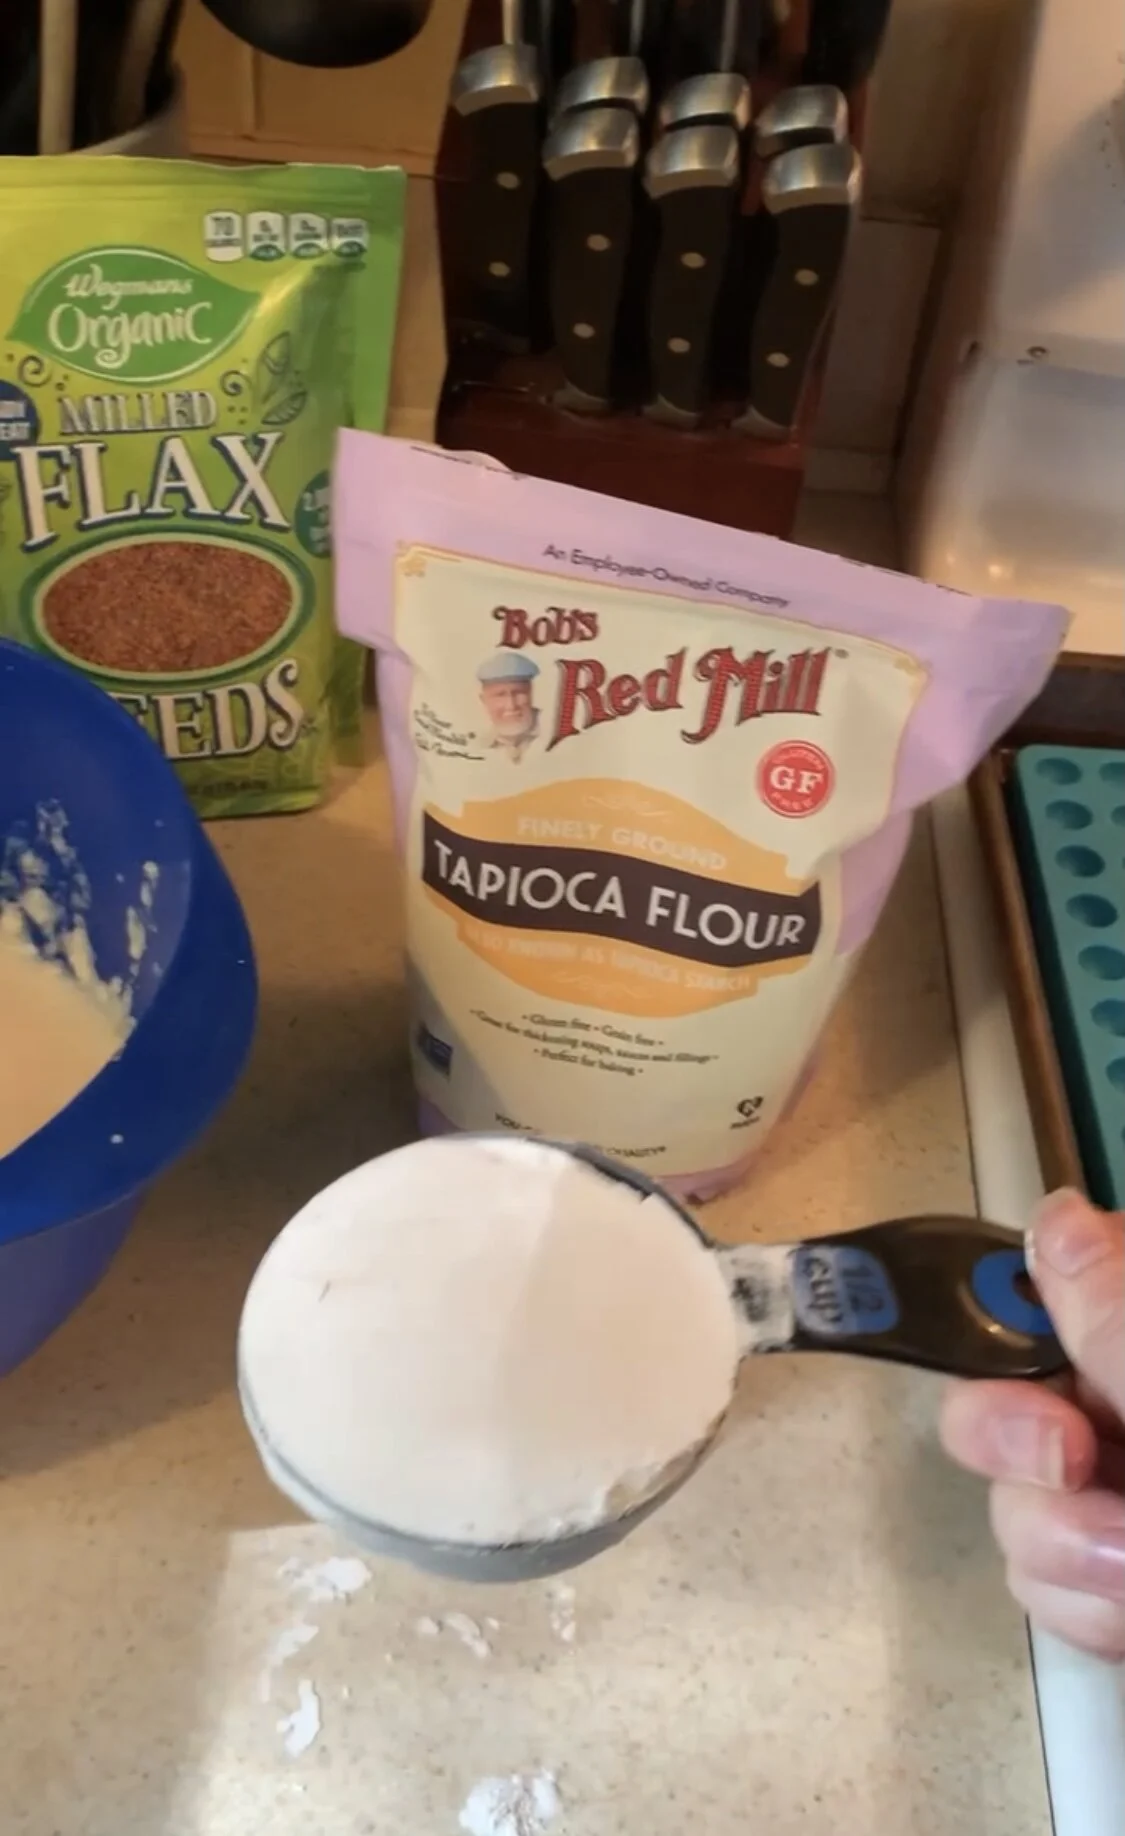
1/2 cup tapioca flour (or similar)
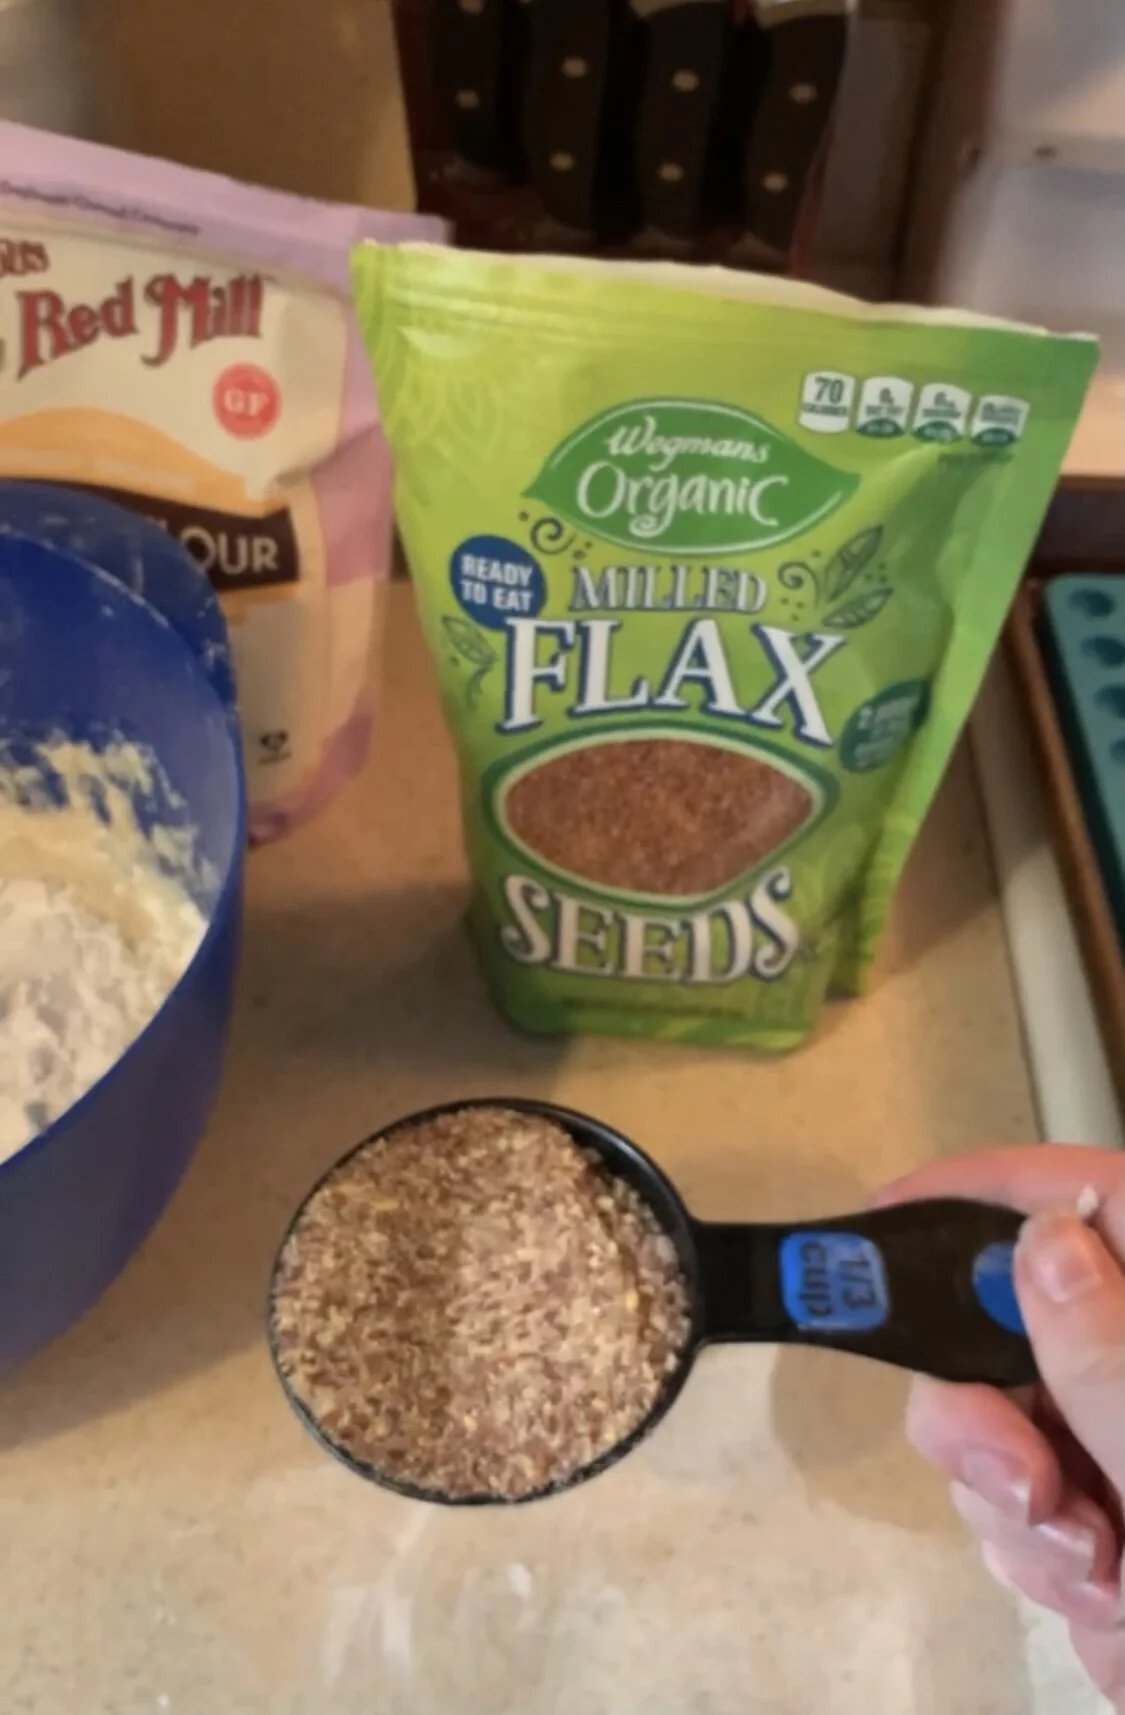
1/3 cup ground flax seed (optional)
Anything else you'd like to add for your pup!
⏰ Time Commitment
With five minutes of prep, and 15 minutes to cook the treats, all in, this DIY project should take around twenty minutes.
⚖️ Skill Level
Easy (as long as you've baked/cooked anything in your life before!).
✅ Step by Step: How to Cook Your Dog Homemade Training Treats
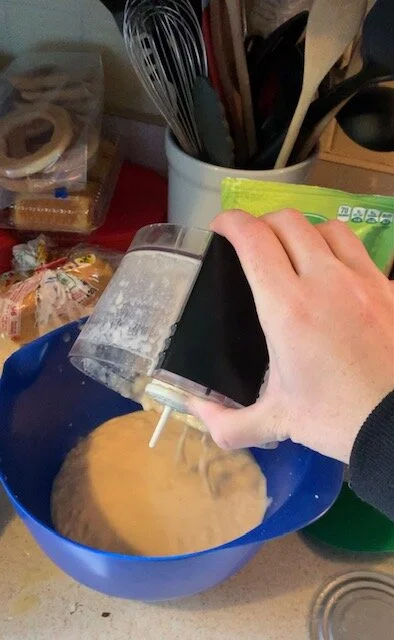
Gather all of the ingredients.

Pre-heat oven to 350 degrees F.
Crack two eggs into your food processor or blender

Add in the 10oz canned chicken (including the water in the can)
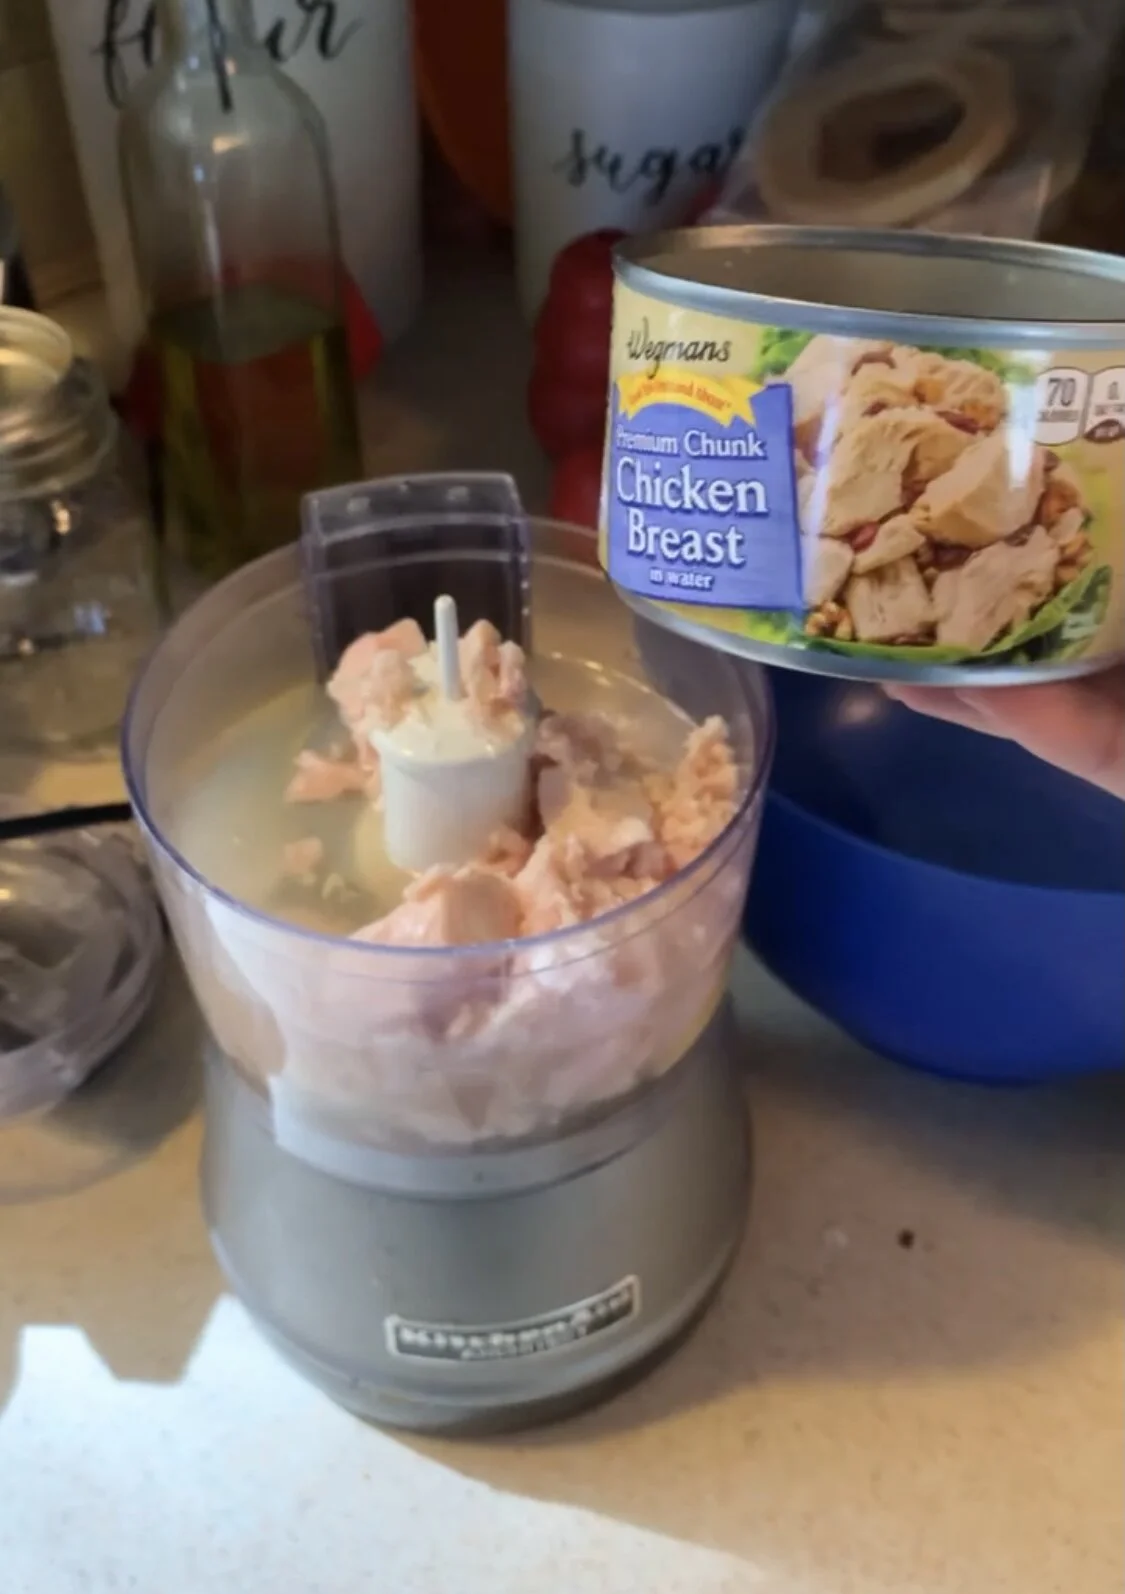
Blend together until smooth
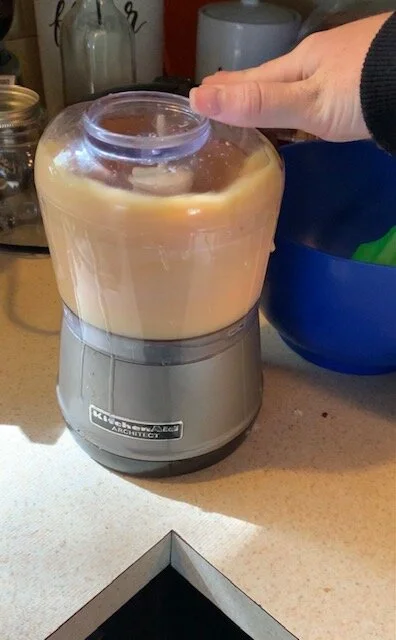
Pour mixture into a mixing bowl
Add the 1/2 cup of tapioca flour to the bowl
Add the 1/3 cup ground flax seed (optional) to the bowl as well
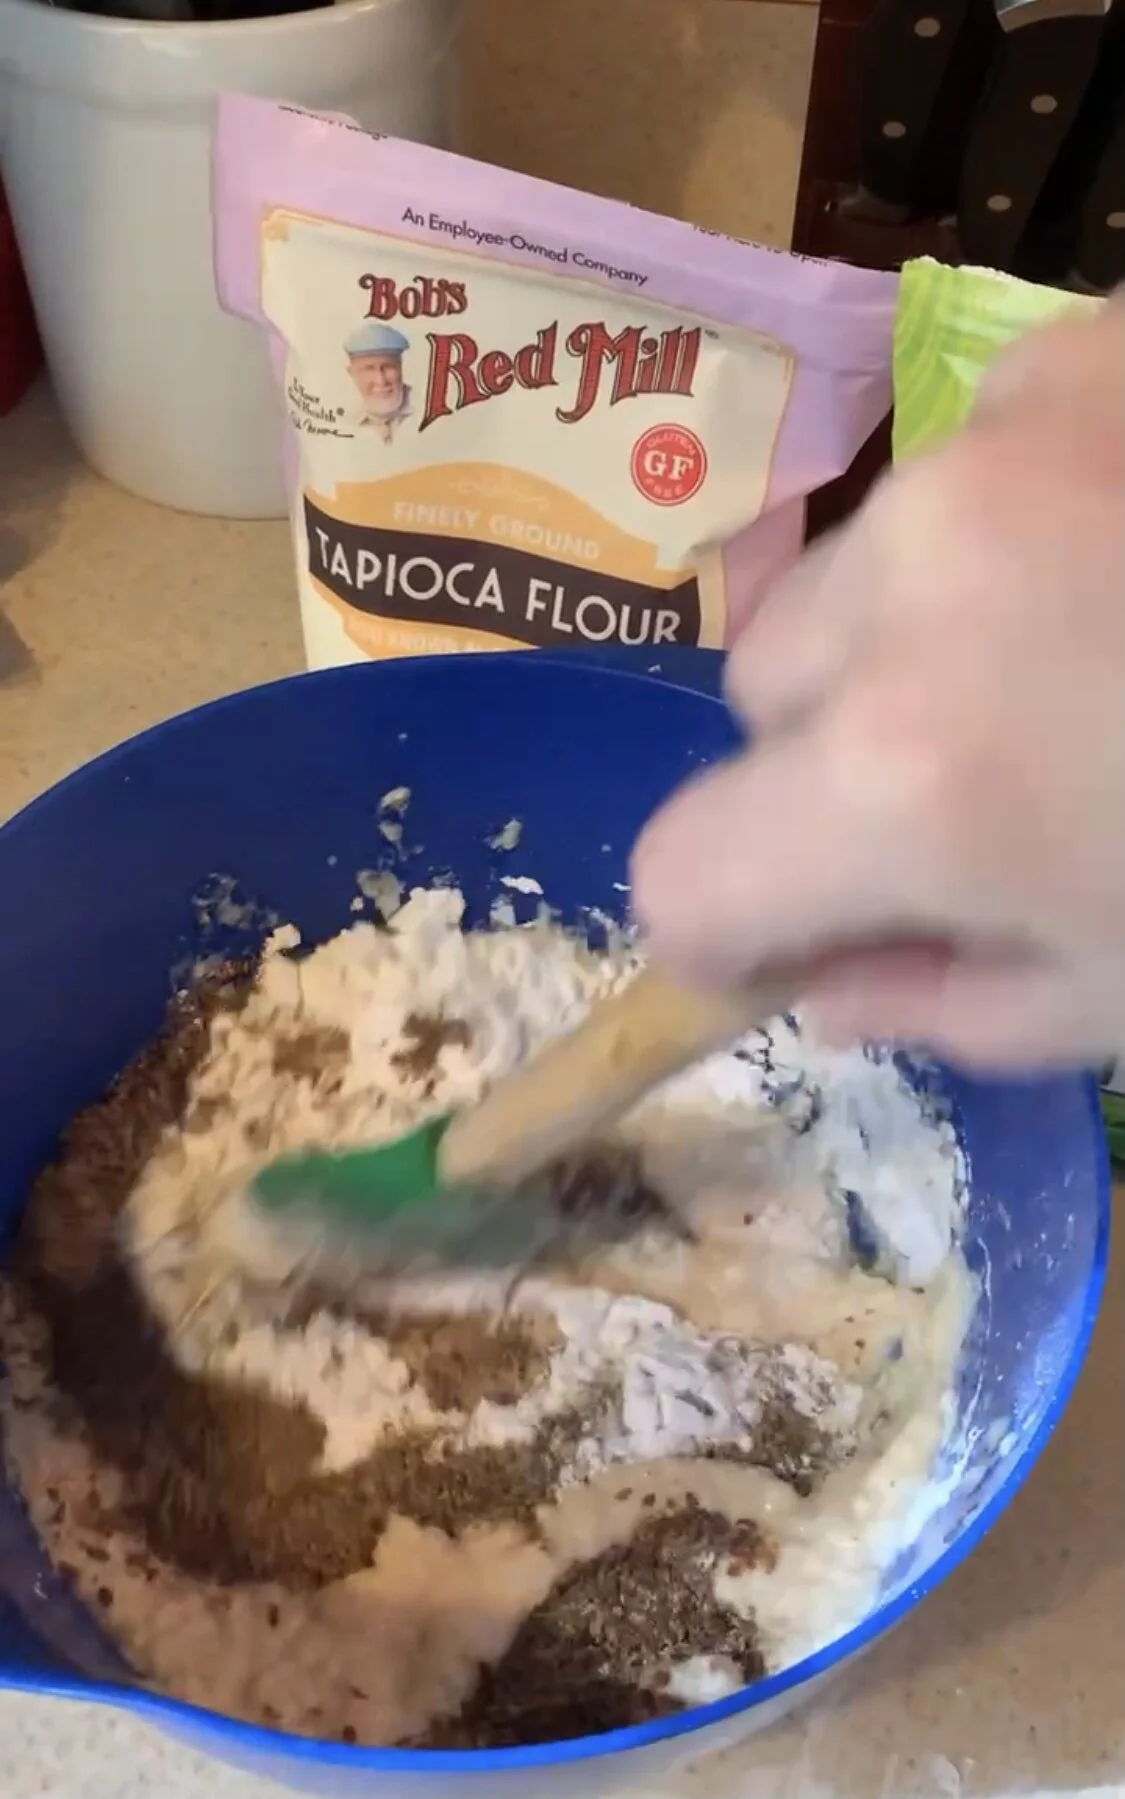
Add any other ingredients like supplements, CBD oil, really anything that your dog likes and is safe for your dog because you can't ruin the recipe
Mix everything together
Assess the consistency of the mix because you want it similar to a pancake batter. It should not be too runny, but thin enough to squeeze out
Add additional flour to thicken or water to thin it out (the type of flour you can use here is flexible! Tapioca flour will help it give some "chew" and stop it from being too crumbly). I usually will use both Tapioca flour and whole wheat flour.
Pour the batter into a plastic bag (or a pastry bag if you have one!)
Cut the tip of the bag to make a small hole to squeeze batter out
Place your silicon mold on a baking sheet
Squeeze the batter into the mold (or you can always just pour it out and just spread it around)

Place the sheet into the oven and bake from 12 to 15 minutes
Your treats will easily fall out of the mold once cooked, so pour them into a bowl to cool down

ENJOY!! Depending on the ingredients you used, take a taste test yourself. What's better than a dog treat that you're comfortable eating!
NOTE: Store in an air-tight container in the fridge! They will last about a week or so... but if you're anything like us, you're always reaching for treats to reward those amazing dogs of ours!
If you have something that you’d like to DIY for your #TOCFam, please fill out our form here.
*[Disclosure: This post may contain affiliate links, meaning TOC may get a commission if you decide to make a purchase through our links, at no cost to you.]

DIY: Make Puzzle Toys for Your Dog Using Recycling
Editor’s Note: This month we posted a poll on Instagram about all things DIY and we were blown away by how many of you make things for your dogs at home. So this week we are trying something new and kicking off our first DIY series, where YOU will teach our #TOCFam how to make cool stuff. Meet Emily Ische, our first DIY-er. After losing her first dog, Gamora, a few months ago, she’s fostered a couple of pups, but is still looking for a new best friend who may also enjoy therapy dog work. Emily tells TOC, “As a kid, I systematically checked out every book on dog training from my elementary school library and would read them in front of my parents to try and convince them to get me a puppy. It never worked.” Her parents did send her to zoo camp though (we are so jealous!) where she made puzzle boxes for wolves. “It was really cool to watch them joyfully destroy the boxes.” Keep scrolling to learn how to make Emily’s puzzle toys for your dog!
📎 The Supplies That You’ll Need to Make the Recycled Puzzle Toys
Emily loves this photo of her with her last dog, Gamora, whom she lost a few months ago.
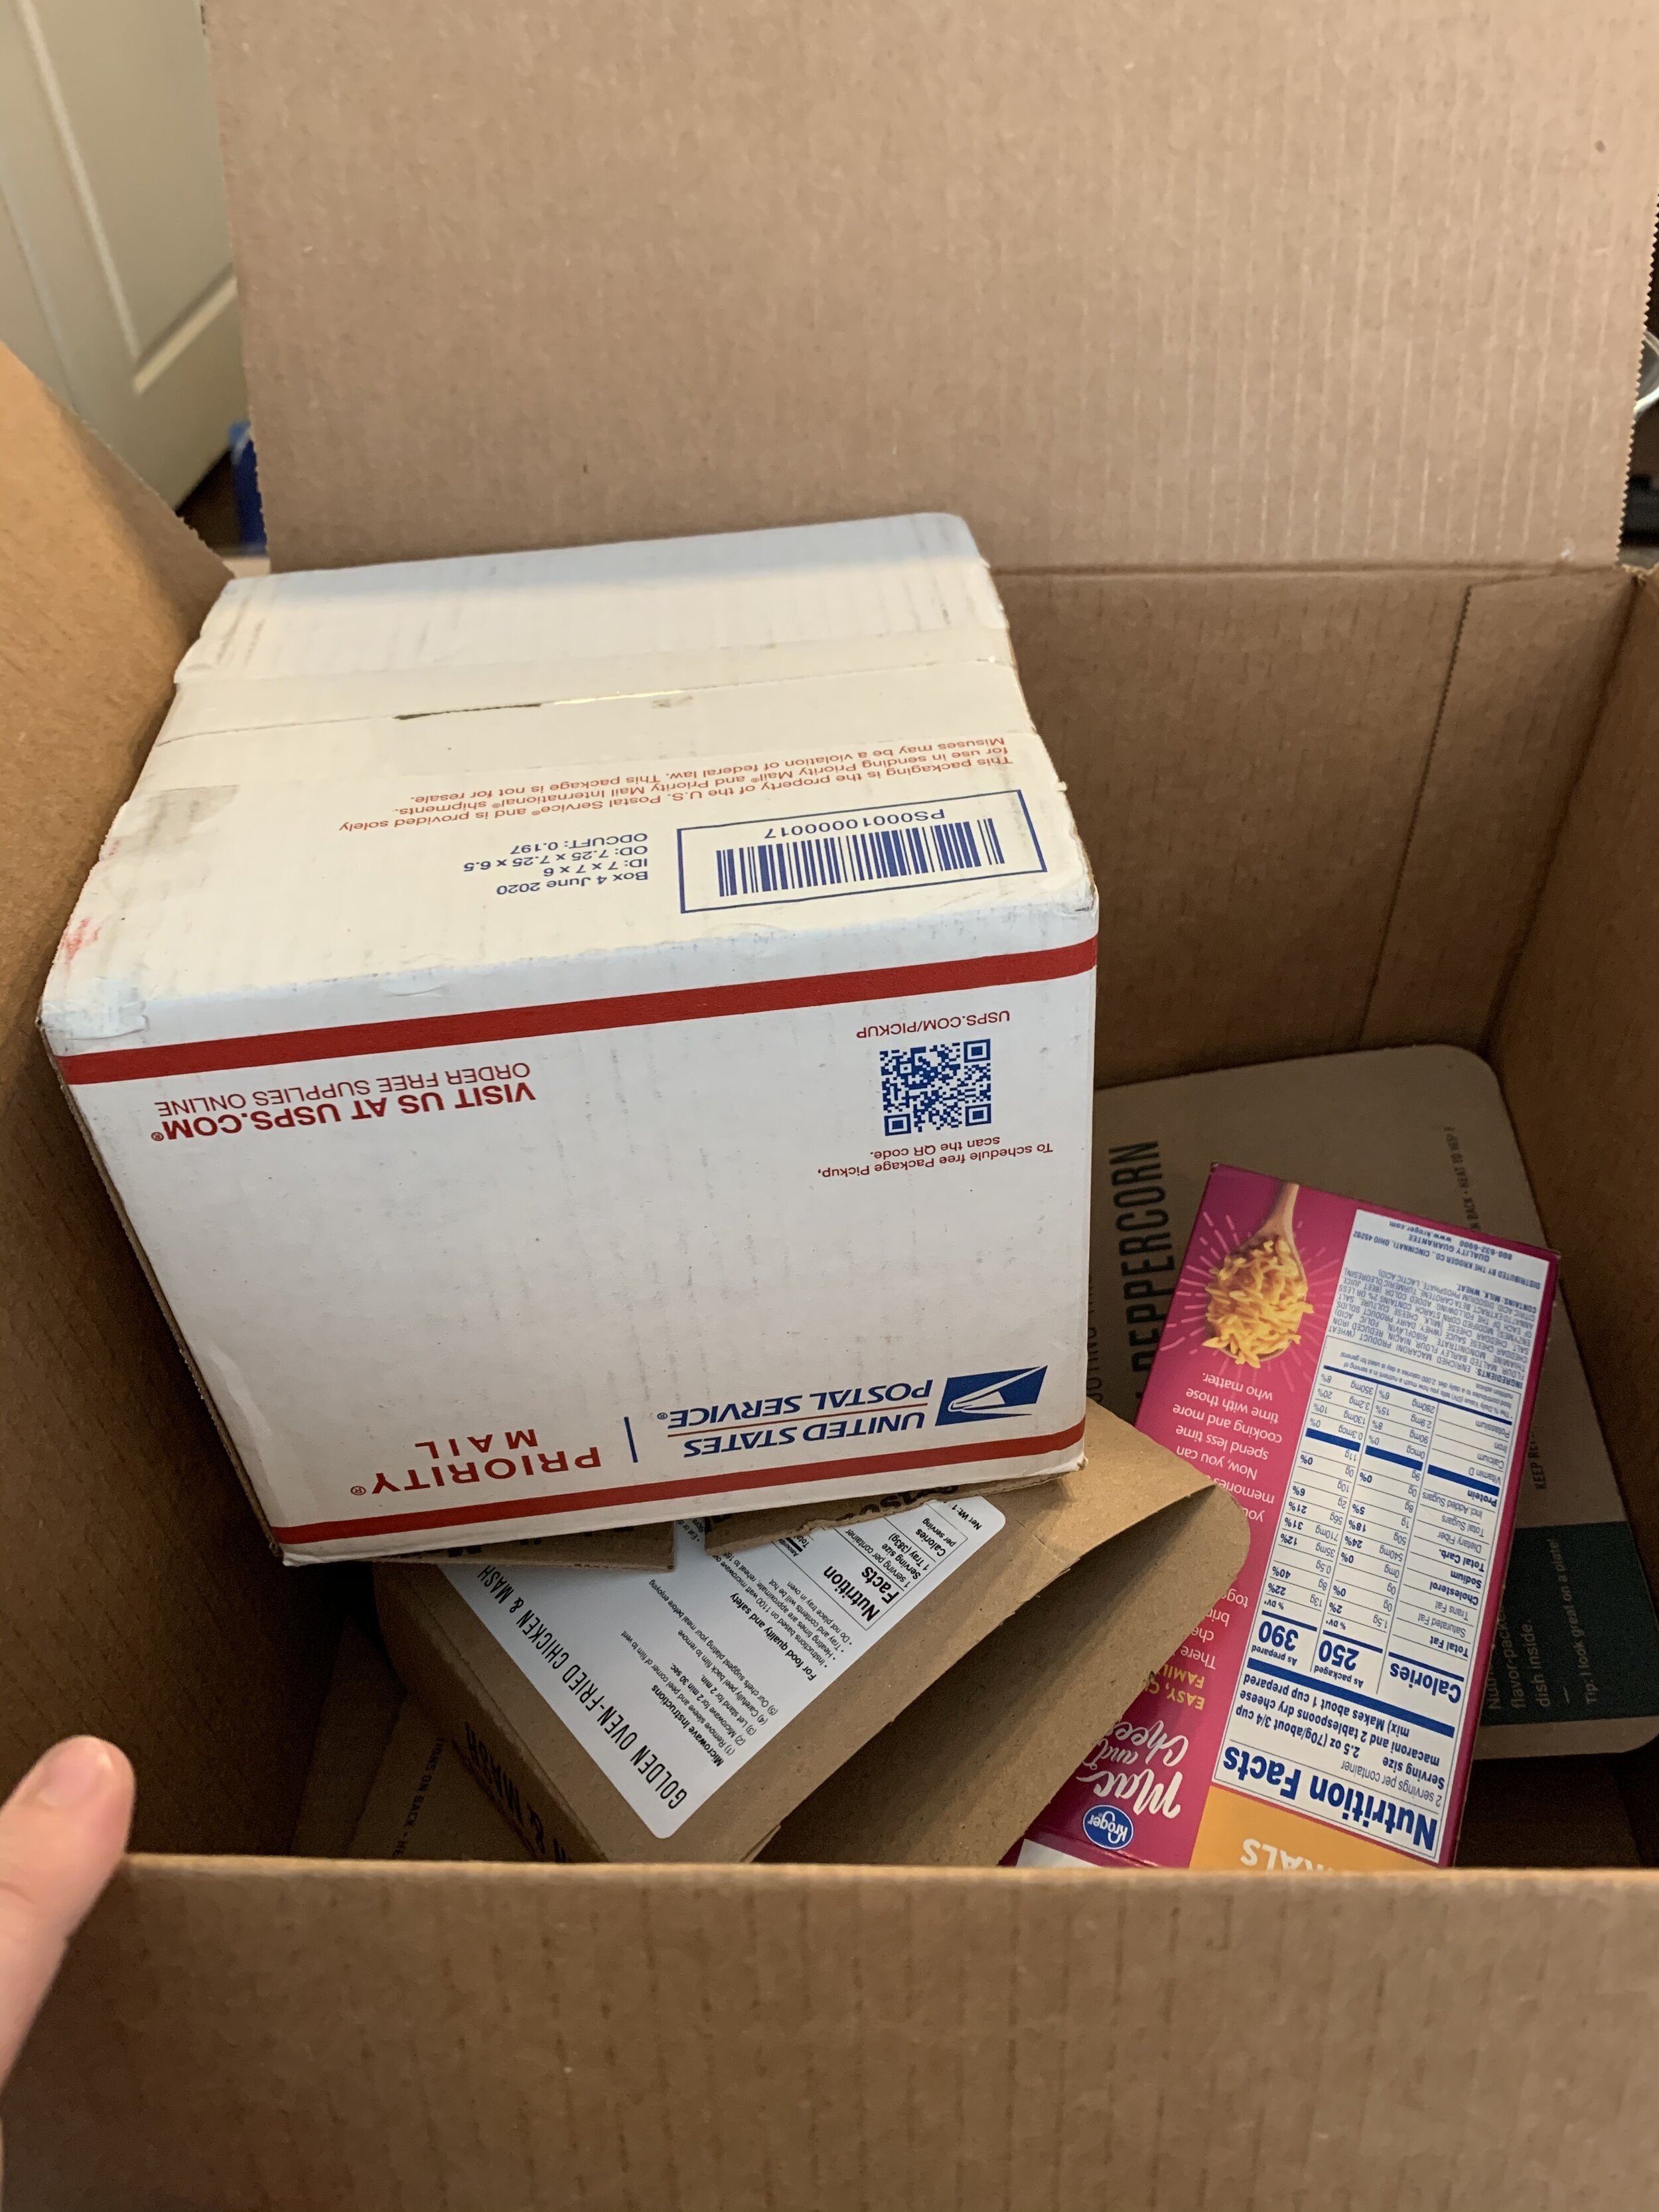
Cardboard boxes or toilet paper/paper towel rolls
Scissors
Tape
Dog treats
⏰ Time Commitment
All in, this DIY project should take around five to 15 minutes.
⚖️ Skill Level
Easy!
✅ Step by Step: How to Make Your Dog Puzzle Toys
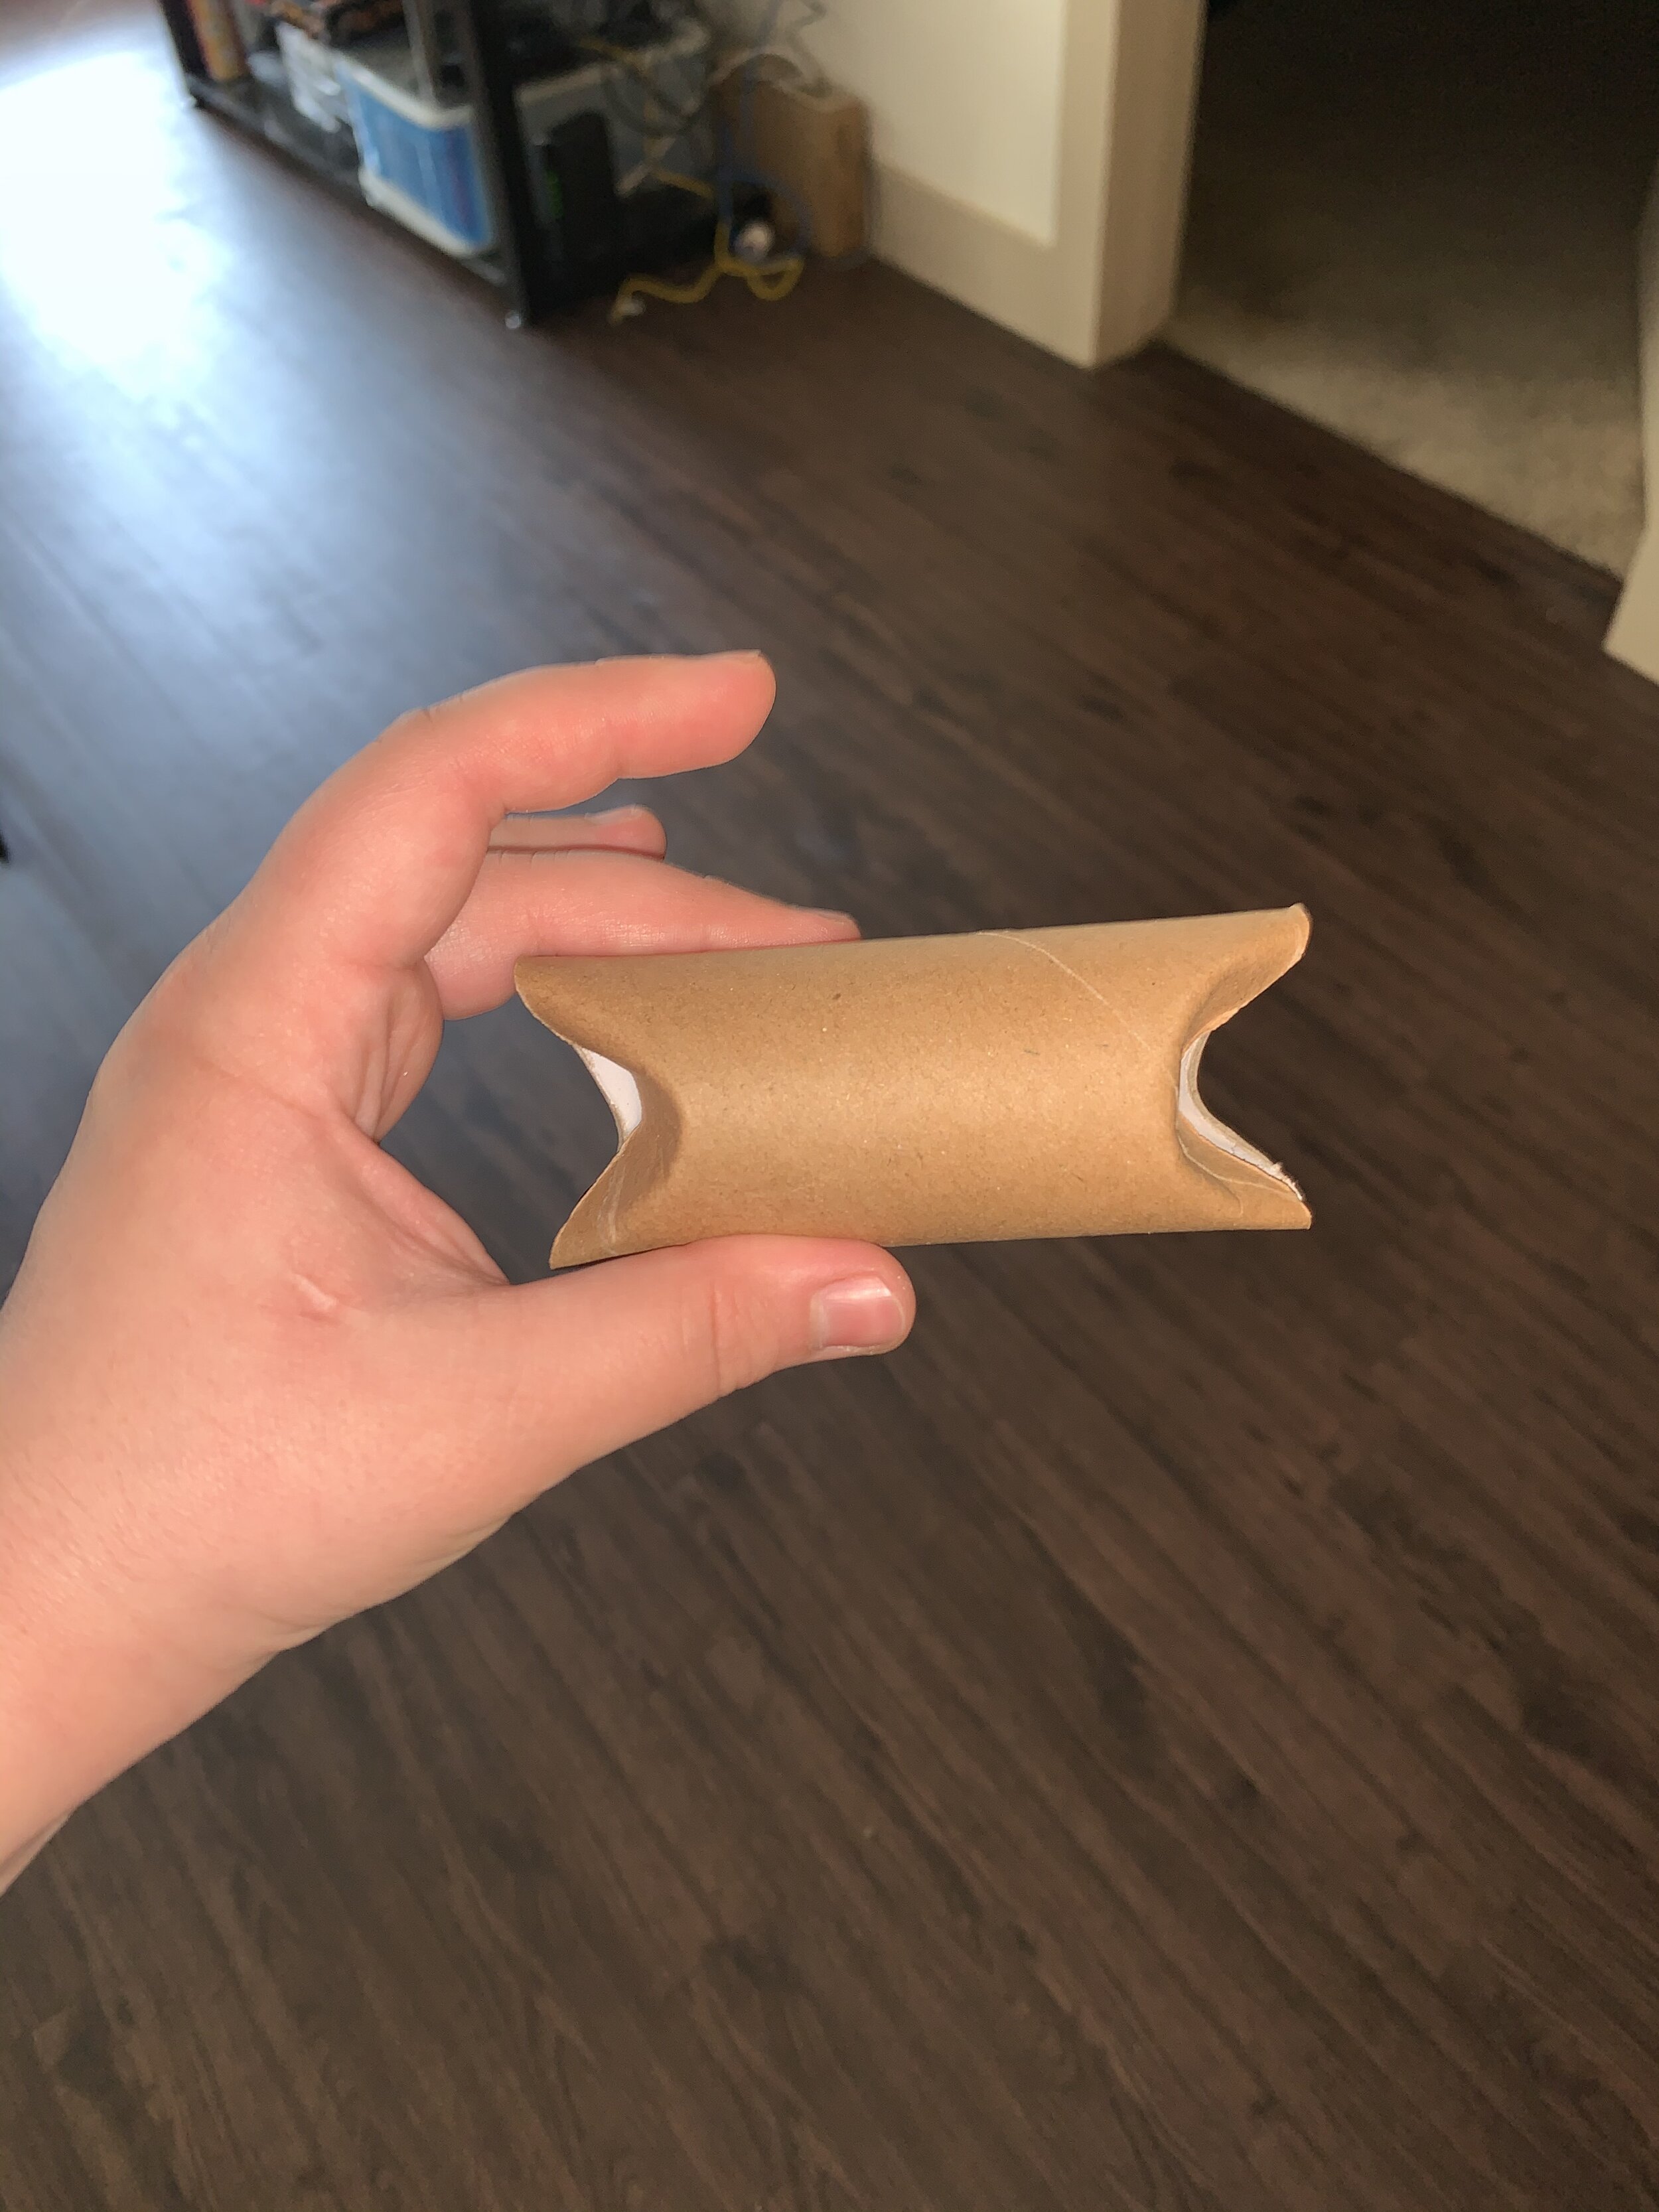
Go through your paper recycling and look for paper rolls or boxes that are the appropriate size for your dog to play with.
For paper rolls, bend the ends in to seal off one side, add treats, and then bend the other end shut.
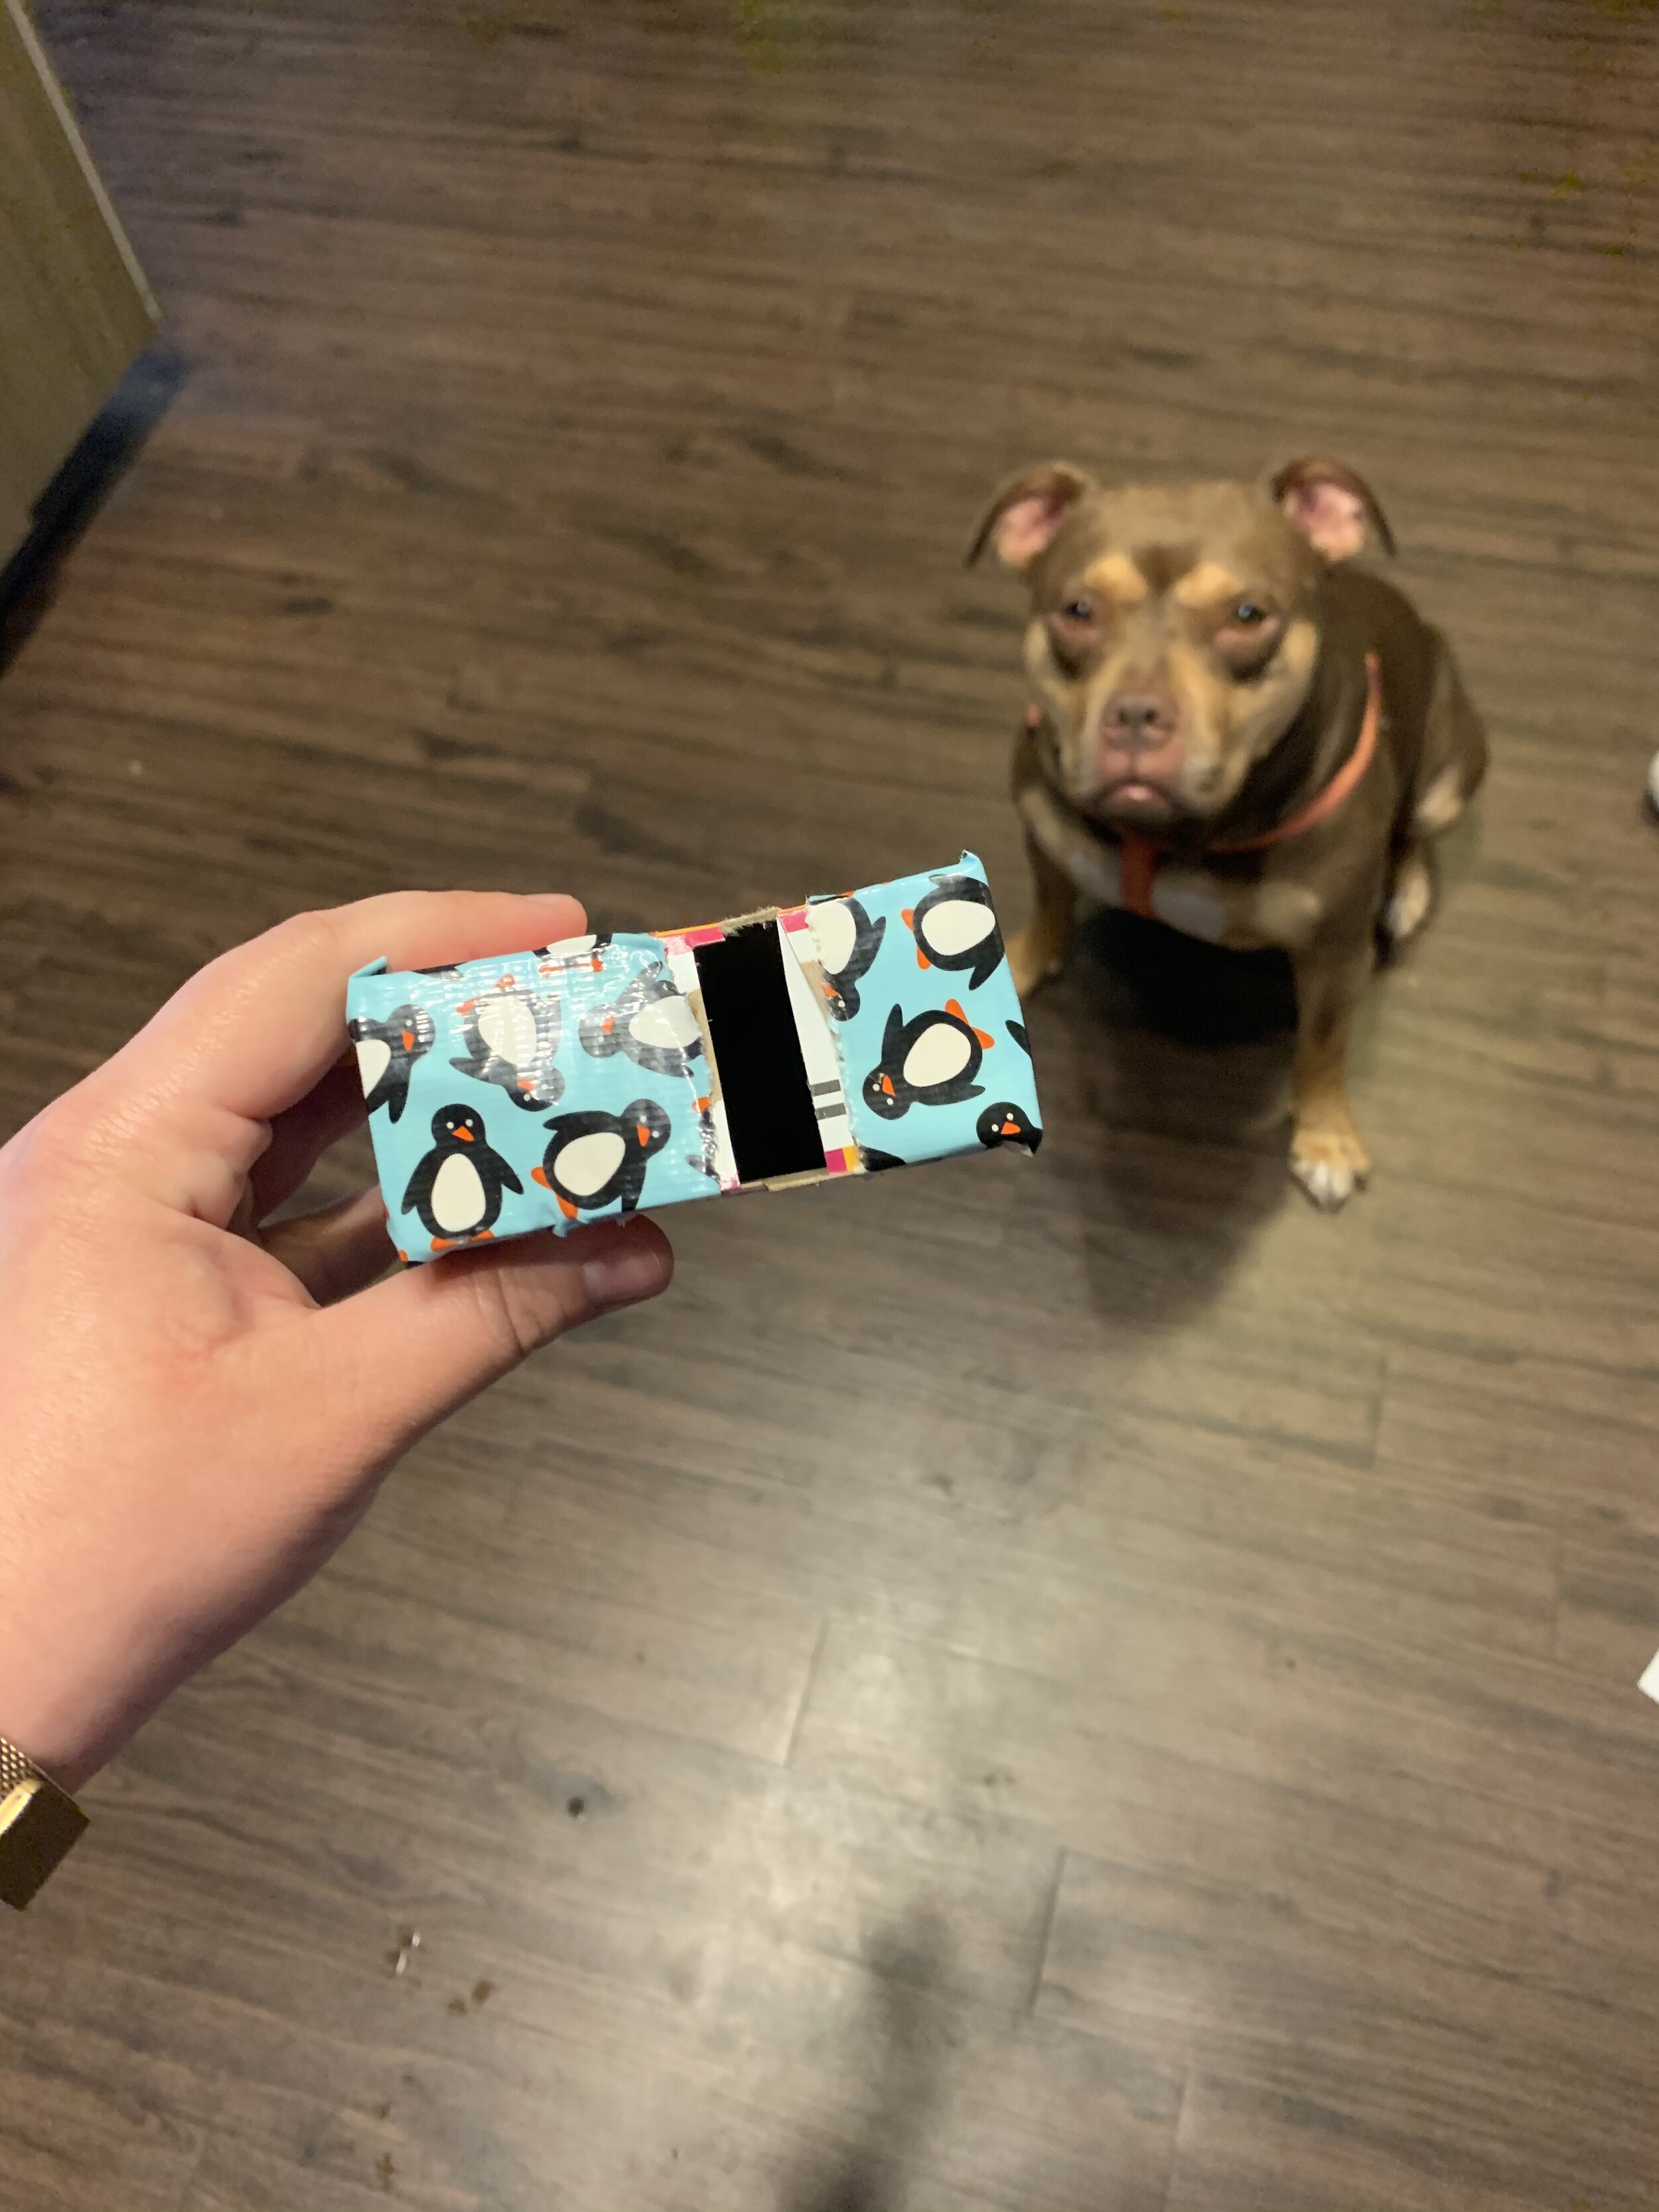
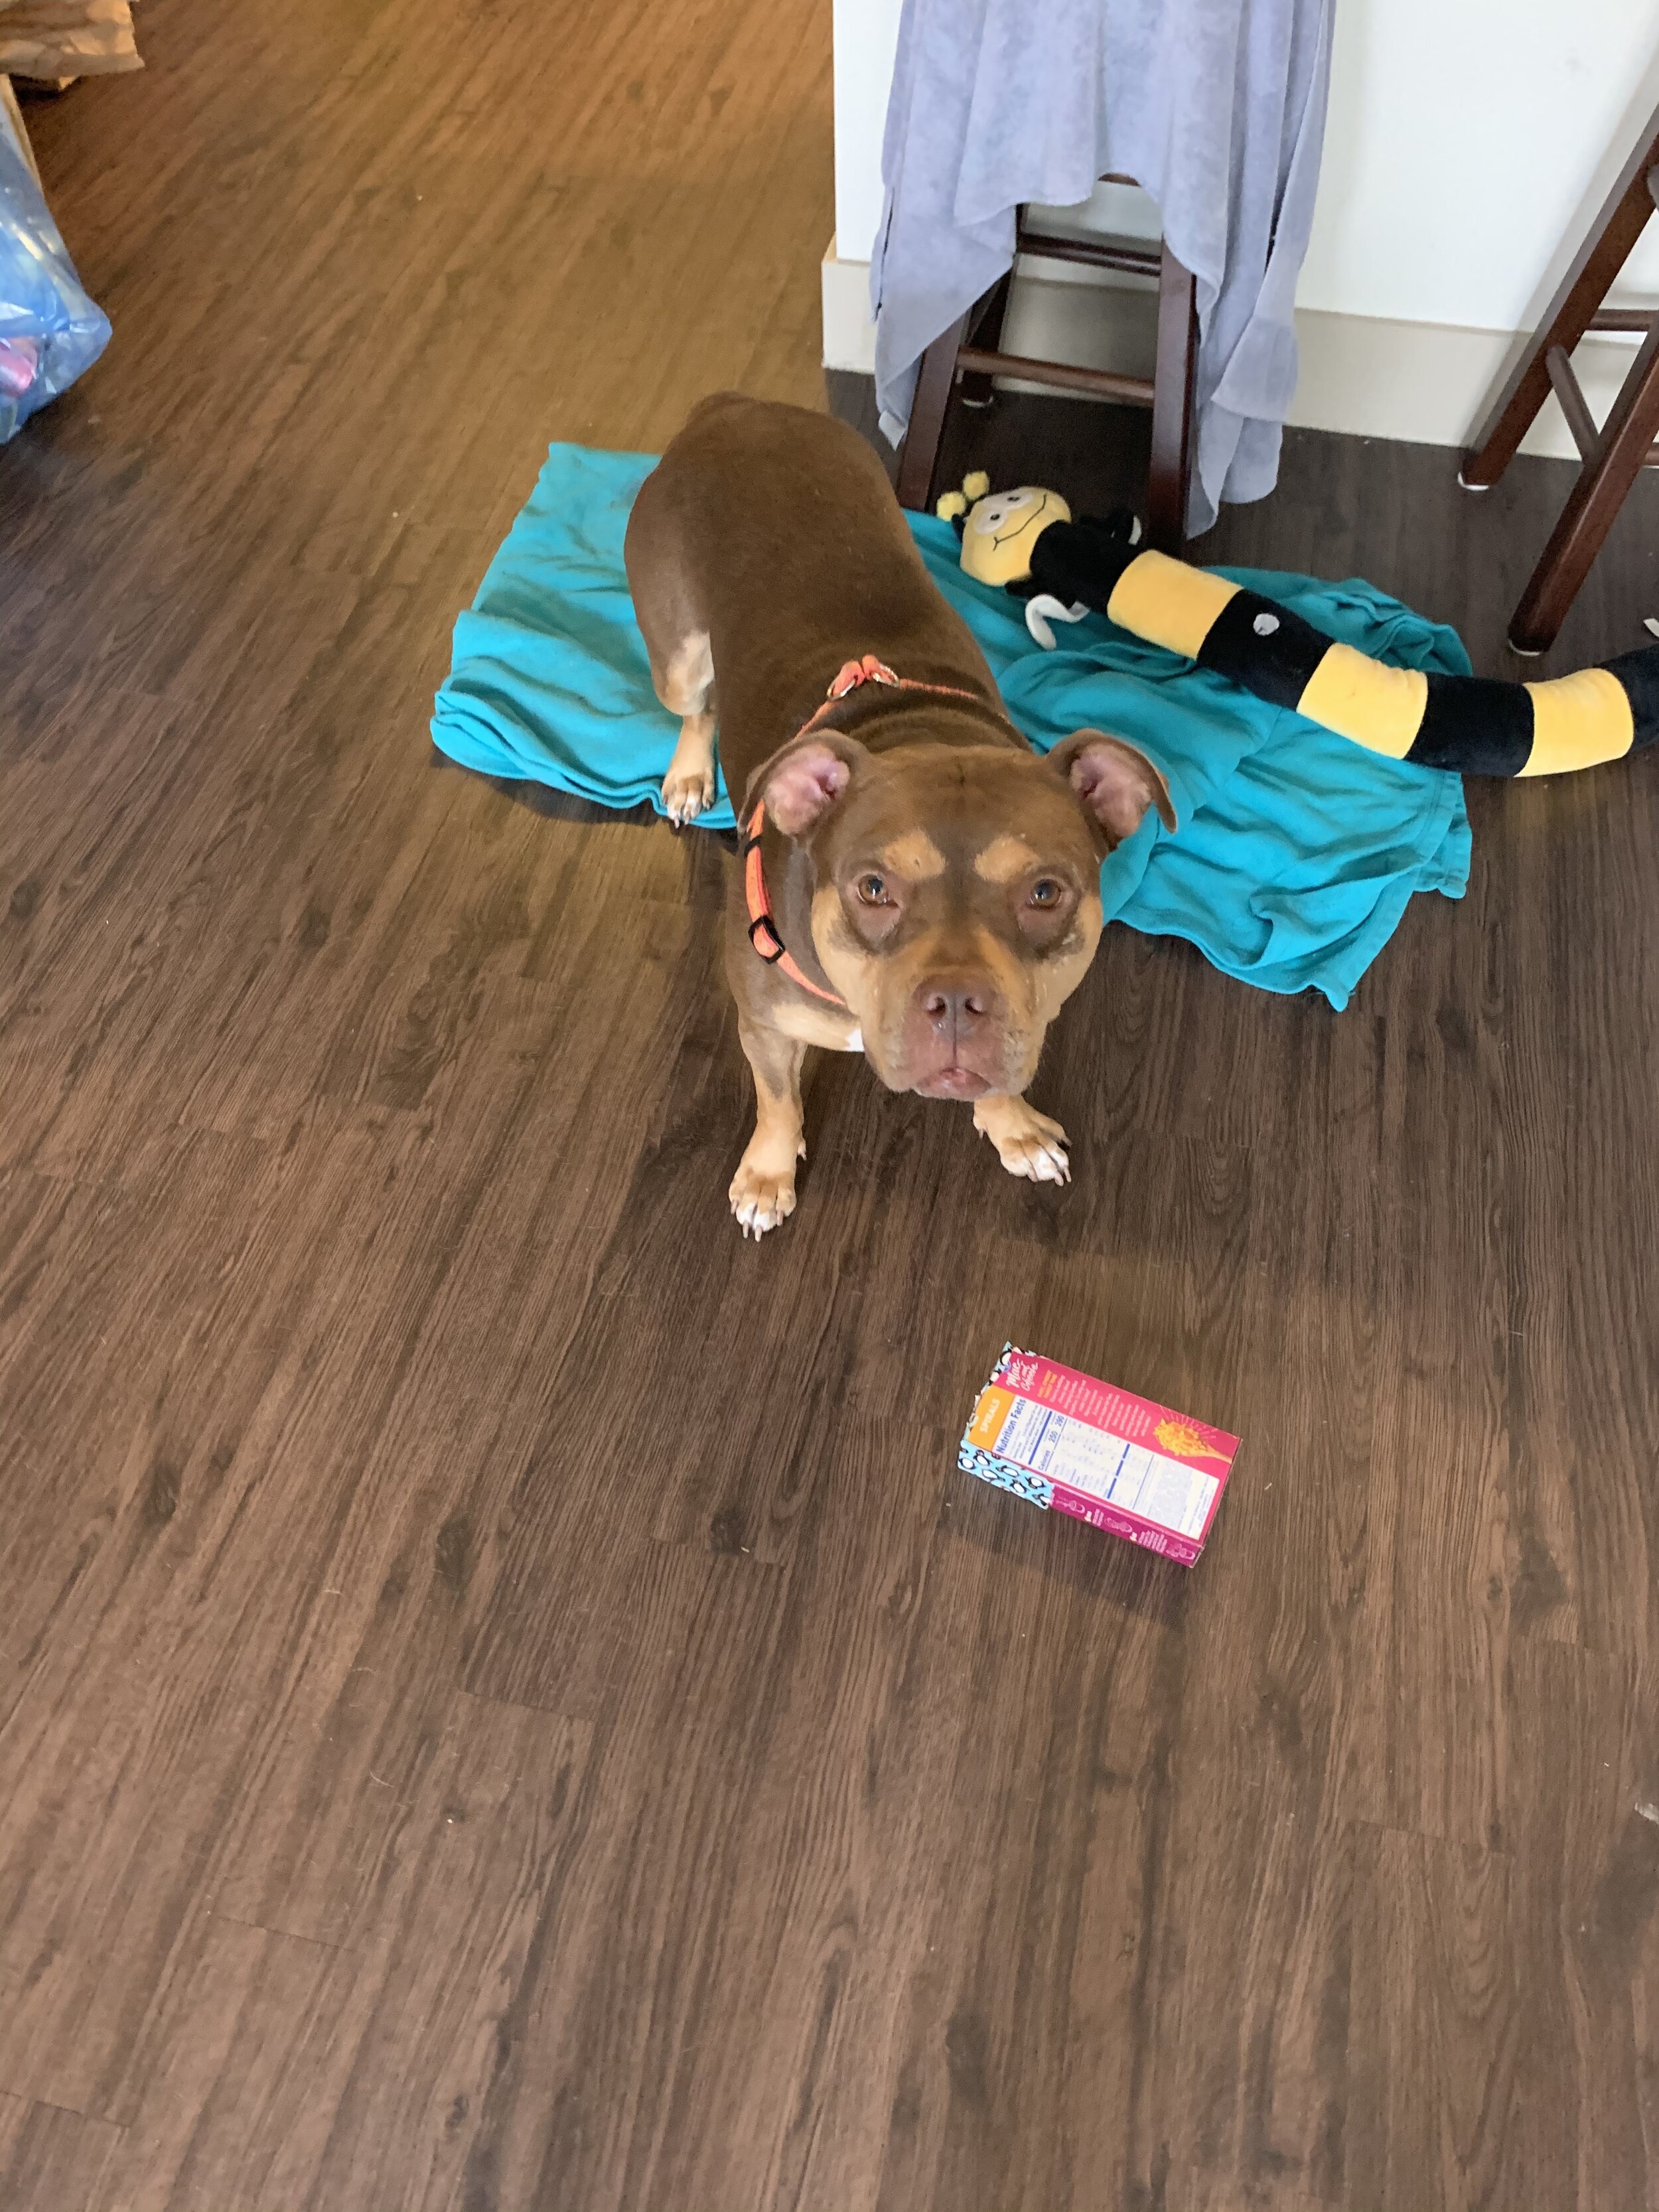
For small boxes, cut a slit large enough for the treats to come out. Fill the box with treats and tape shut if necessary
If you have numerous boxes, you can hide food/treats in smaller (open) boxes and let them rummage around to forage for food.
Be creative! If you have a dog that likes to destroy boxes you can seal them completely and let them go to town. Just make sure you don't make a box that is too challenging for your dog.
General Warning: Make sure to supervise your dog while they play with these toys as some do enjoy eating cardboard. While small amounts of cardboard typically don't pose a health risk to most dogs, ingesting large amounts of cardboard can cause GI blockage. If your dog seems to enjoy munching on cardboard, this enrichment is probably not for your pup.
If you have something that you’d like to DIY for your #TOCFam, please fill out our form here.